First of all, you need to choose the right type of bow. Even in the presence of remarkable strength, learning to shoot from a bow is on models with a weak bowstring tension. For the first time, you can: if there are additional rules for caring for him, he has a simple process of charging arrows, does not require large forces to pull the bowstring, is more accurate and efficient. Do not buy a model with a huge number of additional modules. First master the principle of shooting with a simple bow, and then move on to using additional devices.
Let's skip the intricacies of the bow preparation process and go directly to the shooting technique. In order to better understand our tips on how to shoot a bow, you can try to shoot a few shots yourself. The best way to practice is on the wall of a large wooden building or a special shooting range. Stand on the starting position and without leaving it, try to hit one point or just fire a few shots from the bow in front of you, trying to shoot the arrow along the same trajectory. Arrow hit points will have a large spread, both horizontally and vertically. The farther the firing point is from the wall, the greater the spread will be. The movements made by you in the process of shooting were most likely wrong and uneven. Professional archers produce the same precise movements, therefore, the spread of the flight of arrows fired by them is much less than that of a beginner. Learn not only to move correctly when shooting, but also to accurately repeat each movement you perform.
Here is the order of operations performed in the process of archery:
1. Installing an arrow on a bow. Grasp the bow with your left hand on the handle. Put the arrow shaft on the index finger of your left hand, and rest the groove of the arrow (a special hole at its end) against the bowstring. Arrow plumage should be placed between the index and middle fingers right hand, which lie on the bowstring along with the nameless. The bow can have a special hole for the arrow shaft and even a clicker that presses the arrow to the handle and does not require holding it with the left hand during the shooting process. Be sure to select the model you are using.
2. Manufacturing. Stand with your left side towards the target with your feet shoulder-width apart. Raise the bow towards the target. The right hand holding the arrow with the string should be bent at the elbow parallel to the ground. The left hand holding the handle is extended forward and also parallel to the ground. Slowly, perpendicular to the target and parallel to the ground, pull the string. The plumage of the arrow should be at or slightly below the right eye. In this case, the right hand should rest against the face, thumb can be wound behind the jaw or pressed against the neck. After these actions, the left hand should no longer hold on to the handle of the bow, but rest against it with the palm of your hand.
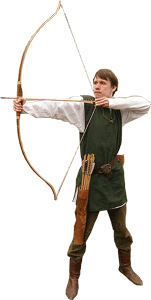
3. Aiming. First, without changing the position of the hands, turn the body so that the arrow is directed in a vertical line perpendicular to the ground and passing through the point at which you are aiming. Changing only the position of the right and left hands relative to each other, perform the process of vertical aiming. If the bowstringed arrow is directly in front of the eye, align its end, the front sight on the bow, or if there is no front sight, the point of the arrow and the point of aim. In the case when the arrow is below the eye, you should look at a point just below your aiming point, and align the arrow parallel to the imaginary line between the eye and the point where it is looking.
4. Archery. Trying not to knock down the position of the arrow and bow relative to the target, draw the bowstring. Release it quickly, while moving your left hand in the direction of the aiming point during the descent.
If, before shooting from a bow, you do a little mental training and the above actions are performed by you with the exact repetition of movements with each shot from the bow, then the arrows will fly with a smaller spread. However, an exact hit on the aiming point may not occur. After each shot, analyze where the arrow hit and what changes should be made to your movements on the next shot. Over time, you can, taking into account the peculiarities of your technique and movements.
Correct technique shooting
Proper shooting technique is just as important as a well-tuned bow, of course, if you want to.
shoot accurately and consistently. Although each archer may have a different shooting style, you need to have the right technique to shoot accurately.
Proper technique is like aiming a rifle scope. If the sight and front sight are precisely brought together, and the shooter firmly holds the weapon in his hands, then the bullets with each shot will fit exactly into the bullseye. If you aim incorrectly or move the muzzle between shots, then the bullets, respectively, will scatter randomly throughout the target. The same is true with bows and arrows. If you
shoot arrow after arrow, using the right technique, then the result will be appropriate - right on target. . If you make a mistake at some point, the arrow is unlikely to fly where
would you like. Therefore, in the early stages it is very important to comprehend and consolidate the correct technique, so that later, already having a common basis, develop intuitive shooting skills.
BASIC ELEMENTS OF CORRECT TECHNIQUE
SHOOTING
To master the correct shooting technique, you need to follow 9 basic elements. While it may seem like it will take you a long time to memorize them all, it actually only takes you a few seconds to remember them all, especially if you practice. At first, each of your movements, according to the program, must be weighed and considered.
Then you will develop muscle memory and consolidate everything in practice. Practice your technique until it becomes a habit. Only then will you be able to fully concentrate on the main task - on the target.
fabrication
Posture, or how you stand in relation to the target, is very important, because in order to fully use the muscular potential of the upper body, you must assume the correct stance. Start by turning your body at a 45° angle to the target. If you are right-handed, then your right shoulder should be laid back, and your left should be directed towards the target. If you are left-handed, then, on the contrary, your left shoulder will be laid back, and your right leg will be put forward towards the goal. In any case, the foot away from the target must be parallel to it, and the toe of the second must point in the same direction as the body is turned.
For better balance, legs should be placed shoulder-width apart or slightly wider. Bend your forward leg slightly at the knee, thereby shifting 1/3 of your body weight onto it. This stance will allow you to turn and tilt your body while maintaining your balance perfectly. If you are shooting at a target that is higher or lower than you, it is very important to tilt the body when aiming the bow at the target. Never raise or lower the bow hand itself, as this can trip you up while aiming, and as a result, the arrow will fly above or below the target.

When aiming up or down, alwaystiltframe.
grip
If you squeeze your bow too hard, it can cause slight warping and distortion, which can result in the arrow's flight path shifting to the right and left and, accordingly,
will result in a miss. If, on the contrary, you hold the handle too weakly, then when the bowstring is released, the bow may simply fall out of your hands. The bow must be held firmly so that the plane of the shelf coincides with the line of the bones of the forearm and wrist. If you mentally extend the line of the shelf towards you, then make sure that its plane coincides with the line of the wrist. This type of grip allows
the best way to hold the bow and evenly distribute pressure on the joints. The shape of the handle can also affect howholding the bow. Modern handles allow you to use
high, medium and low grip.

All you need is a firm grip on the bow. Don't squeeze too hard, but don't relax either.
Tension
There are several opinions about how to properly draw a bow. Some shooters aim the bow first into the ground and slowly raise it as the string is pulled and fixed.
Others argue that the best solution is to lift the bow under angle of 40 degrees to the target and, pulling, slowly lower it.
This method is best suited for hunters, because this way you make less unnecessary gestures. In addition, with a similar tension of the bow from the side, it will be perfectly visible whether the bow is suitable for the shooter in strength or not. If the bow is too strong, then the arrow against the will will have to lift it up a little or start doing strange circular motions bow in order to fully draw it. Therefore, if you cannot calmly and smoothly draw back the bowstring, then this bow is too strong for you.
The grip of the bowstring is performed joints of the first (nail)phalanges of all three fingers of the right hand involved in bow tension (i.e.index, middle and nameless -
Note. per.). It is very important that the joints of the phalanxes are located on the same straight line, so that the pressure of the fingers on the bowstring and, accordingly, on the arrow shank will be uniform. Such a "hooked" grip of the bowstring requires less effort to hold the bow in a taut position and allows you to better release it when you launch the arrow, which, of course, has a positive effect on the flight of the latter. Moreover, this gives
the opportunity to take a break for the muscles of the palm and forearm, forcing the muscles of the shoulder and back to work, as it should be. Proper shooting technique helps to best distribute
pressure on the muscles; the main work of pulling and holding the bowstring is done by the muscles of the shoulder girdle, and not by the palms and forearms.
If you are having trouble releasing the bowstring smoothly when gripping it with your front knuckles, make sure your fingertip or glove is not wrinkled in place.
contact with the string. Such creases can appear over time and cause the bowstring to get stuck. Therefore, if you suddenly find creases on your fingertip or glove,
so it's time to change them. If you are still having trouble releasing the bowstring clearly, try grabbing it with your fingertips rather than with your knuckles. However, this may
require more effort from the fingers of the hand and increased attention with an even distribution of pressure from all three pads on the bowstring.
Firm position of the hand holding the bow
Imagine that your hand holding the handle of a bow is the muzzle of a gun. If, while holding a drawn bow, your hand constantly makes some kind of movement in the air or shakes too much, this will naturally affect the flight of the arrow, and you will most likely miss. Therefore, when you draw the bow fully and hold it in this position, your hand must be as hard as a stone all the time until the arrow reaches the target. You will most likely have to bend your arm a little at the elbow so as not to interfere with the free passage of the bowstring. In addition, bending the arm at the elbow will help relieve excess pressure on the joint and thereby avoid possible injury.
Applying the brush under tension
There are several opinions regarding right position brushes when pulling the bow. To a large extent it depends on yourshooting style. Three-fingered low grip, in which the phalanges of all
three fingers involved in the tension, hold the bowstring directly under the shank, will bring the plane of the arrow closer to the eye. In this case, the best solution would be to press
tip of the index finger to the corner of the lips.
 |
If you use a slotted grip - one finger on top and two under the shank - try pressing the tip of your middle finger to the corner of your lips. All people different size and the shape of the head, as well as the length of the fingers, so you yourself will have to determine for yourself the best way brush pads. However, it is very important that the position of the hand is the same with each shot. Consistent application of the brush will result in consistent precision in releasing the bowstring.
With the bow drawn and fixed, make sure that the forearm of the hand drawing the string is in line with the arrow, and that the abducted elbow is in line with the hand holding the bow handle. Imagine that this is the butt of a gun. Head position is just as important as proper string tension. The line of the arrow should pass exactly under the eye. Finally, if you are right handed,
tilt your head slightly to the left, and lift your chin so that the arrow is parallel to the line of the right eye-target.
How long to hold the bow in a taut position is up to you.
If you are sure that you aim well, release the arrow. If not, then keep the bowstring fixed until you are completely ready. If you suddenly begin to tremble and can no longer hold the bow straight, put it down and rest. No one said that once you pulled the bow, you should definitely shoot.

The best position of the brush when fixing the tension is the tip
the middle finger is pressed to the corner of the lips.

Competent alignment of the hand holding the bow, elbow and hands,
pulling the bowstring is the key to proper shooting technique.
Visual memory
Over time, gaining more and more experience in intuitive shooting, you will develop in yourself the so-called visual memory. Your eyes see the target, the brain processes the information received, determines the distance and gives a signal to the body, the body in response aims the bow at the target. When you fully develop your skills, the whole process will begin to take a few fractions.
seconds. But it takes time and hard practice to develop these skills. Before you even started drawing your bow,your gaze should alreadybe focused on the goal. There should be nothing left around you but the goal. clear concentration andcomposure with every shot- this is the key to a good visual memory.Some archers use special technologyaiming at the top of the tip. We won't teach you this because we don't use it ourselves.method, but you should anywayhave an idea of what is being said. In this case, the archer uses the tip of the target orblade tip asflies, raising or lowering it relative to the target, depending on the distance. Accordingly, the closer the shooter is to the target, the lower he lowers the tip. And vice versa, the farther it is from it, the higher it lifts the tip. Although with this
bow shooting system and no scope is installed as such, archer everything it is equally necessary to know the exact distance to the target. Therefore, this method of aiming is mainly used by archers participating in tournaments, since accurate distance measurements are taken there.
Breath control and bowstring release
These two aspects of archery shooting goes inseparably. Studies have shown that if you exhale air from your lungs when you launch an arrow, the flight path will be very high. If, on the contrary, you inhale at the moment of releasing the bowstring, the arrow will fly low. Does this mean you have to hold your breath? Yes, of course, but only as much as is necessary to launch the arrow. The following exercise will help not only target archers, but also hunters,who just needcalm down just before releasing the arrow.
So, fill your lungs with air and exhale slowly. Inhale deeply again, exhale half and hold your breath, pull the string, aim and shoot. Another way to control breathing is used by snipers and is still used by the military today:specially without exhaling,just giveair slowly exit the lungs and hold your breath For a fraction of a second, enough to make a shot.
Proper bowstring release is the key to a good arrow trajectory. Stretching and fixing the bow, make sure that the bowstring does not creep forward. Fingers should be straight and not
clenched into a fist.

In order to achieve the best possible perfect release of the bowstring and to fully utilize the full potential of the bow, try to maintain a constant bow during shooting.counter tension. After pulling and fixing the bowstring, concentrate on the target, and as the bowstring slides off tips fingers, try to pull back the elbow of the pulling arm, using the muscles of the shoulder girdle and back. By pulling your elbow back, you thereby pull your arm andfingers from fixation point allowing the string to slide freely.
Some intuitive archers never linger at the point of fixation, while others draw their bow and fix their hand in that position for a split second, and
then continue to pull the elbow back and release the bowstring. No matter how long you wait, try to maintain a constant counterstretch by locking the bow in place without letting it straighten out.
Inertial motion
The inertial movement consists in the natural retraction of the pulling arm back after the shot. In this case, the hand holding the bow remains in an extended position until the arrow hits the target, and the eyes trace the entire flight of the arrow to the target itself.
WARM-UP BEFORE SHOOTING
For further improvement of shooting technique, the following set of exercises and warm-up exercises is recommended. All athletes must warm up before starting
to perform any exercise that requires great effort. Archery may not seem like much to many. active view sports, but be that as it may, it also provides
effect on muscles and joints. Have you ever picked up a bow and noticed that at the first pull, your muscles and joints begin to ache and hurt a little? This happens because
that they are under stress for which they are not yet ready, and this can lead to serious and possibly long-term injury. Therefore, a few extra minutes spent warming up before shooting will not only help you avoid possible injury, but will also affect the accuracy and accuracy of the first shots.
Knead not only the parts of the body involved in drawing the bow, but the whole body as a whole to get the blood circulating more actively. Start with normal jumps in place for 35-40 sec. This will stretch the whole body and, importantly, the shoulder girdle. We understand that some
be not very comfortable to warm up in this way on people and can be understood. In this case, an alternative option is possible - you can simply start with a partial draw on the bow and gradually work up to full without experiencing any discomfort. Perhaps over time you will develop your own way of warming up better. All in your hands. In any case, our body must be ready for the stress of constantly drawing the bow.
TECHNIQUE IMPROVEMENT EXERCISE #1
This exercise does not require the installation or release of arrows, but it is very important for the development of proper shooting technique. All you need is a bow and a mirror. Just take the right stance, draw the bow, fix it in that position and
lower it slowly. While looking in the mirror. Are you doing all of the above correctly? Repeat the exercise until you are completely sure what the correct shooting technique really is. If you notice
mistake in the performance of one or more elements, repeat the exercise until everything is corrected. Once you're done with that, move on to exercise #2.
TECHNIQUE IMPROVEMENT EXERCISE #2
For this exercise you will need a bow, one arrow and a bag target. Secure the bag at chest level and make sure there is a safe area behind it to stop the flying arrow in case of a miss.
Stand in front of the target at a distance equal to the minimum flight of the arrow from the bow to the target. The distance between you and the target should be such that the arrow, stuck into the target, does not
concerned outside Luke.
This exercise isreleasing an arrow at a target withclosed eyes. And this is the only circumstance under which you should close your eyes when releasing an arrow! This exercise will help you better concentrate on correct execution all elements of shooting technique, without being distracted by foreign objects and without worrying about whether the arrow will hit the target or not.
So, to begin with, take the correct stance directly opposite the target so that the arrow immediately hits it as soon as you release the bowstring. Now raise your bow, close your eyes and release your arrow using proper shooting technique. This is the only thing you should worry about at this moment. While your eyes are closed, mentally and tactilely check all the elements of the technique as you pull and fix the bowstring. Make sure you're doing everything right. In this exercise, you need to concentrate only on yourself. Your brain must analyze every step from start to finish. If you feel that you are doing something wrong, go back to exercise number 1 and correct the mistake. If the problem is proper bowstring release, you will of course have to fire the arrow to correct any errors and develop fluidity.
We advise you to repeat this exercise until you have fired at least 800-1000 arrows in this way. In addition, we recommend firing 5-10 arrows in this manner before each training session. You won't be able to become a good intuitive archer until you learn the basics of correct shooting technique and practice them so that they are imprinted in your brain and become second nature. At the same time, don't be too zealous! Don't try to shoot all 800-1000 arrows in one or even five days. Set your own training pace. Hone your technique
shooting only as long as you are still able to concentrate and perform all actions correctly. Once you have fired at least 800-1000 arrows using the correct shooting technique and are comfortable with the bow, move on to the next step.
Basic exercises
for accuracy
Having perfected your shooting technique so that it has become second nature and no longer requires much thought and uncertain movements to shoot an arrow, you can proceed to work on accuracy and visual memory. Most likely, you will not hit the "bull's eye" from the first shots, even if the distance between you and the target is minimal. Don't worry, that's how it should be! Your mind and body want the arrow to hit the target, but they have not yet learned how to work together. By practicing a set of exercises, using the correct shooting technique, you will quickly lay the foundation for future victories. Human body- an amazing mechanism that can quickly learn how to perform a new task and benefit from its own mistakes.
Next a set of exercises You You will shoot from predetermined distances. This will help you aim better at first. As your experience and knowledge grows, you will be able to hit the target from any distance, because you will use the already formed visual memory, and you will no longer need accurate measurements. As soon as you focus your eyes on the target, the brain, having analyzed the situation, will send a signal to the body. And it, following the instructions of the brain, will itself correct the trajectory of the arrow. Ultimately, you won't need accurate measurements anymore. Over time, you will begin to notice that your accuracy decreases at a certain distance from the target. The maximum distance to the target at which you can accurately hit the target is called the maximum effective range.
For basic marksmanship exercises, you will need a bow, one arrow, and a target bag.
Set the target at chest level, making sure it is behindthere is a safe space to stop the arrow in case of a miss. With a black marker, draw a circle in the center of the target with a diameter of 5 cm . There are two reasons for using such a small target: firstly, you will be a short distance from the target; secondly, the smaller the goal, the more concentration and composure is required of you. Also, if you're going into bow hunting, this exercise will teach you how to hit the desired area of the animal's body instead of shooting at random all over the target. You will need a lot of composure and concentration,
therefore, make sure that nothing distracts you, and, most importantly, do not rush to release the arrow.

During these exercises, you will fire only one arrow at a time. Firstly, thanks to this, the target field will be free all the time and nothing will distract you; second, so you
less risk of breaking or bending all your arrows. Warm up before each archery session and don't overexert your body and mind. If you start to feel tired or weak, rest and continue your activities later. These basic exercises should be joyful. Try shooting a few arrows with your eyes closed at the beginning of each lesson, and after making sure that the shooting technique is correct, proceed to the exercises.
PHASE ONE
At the first stage, the distance between you and the target should be one and a half meters. No more, no less! Stand in front of the target and take the correct stance. Focus your gaze on
small black circle in the center of the target.
Peer into it until all other foreign objects are
will start to blur. Raise the bow without taking your eyes off the target. Stretch and lock the string and shoot the arrow straight into the center of the target. Don't forget to keep an eye on correctness shooting techniques. Follow the flight of the arrow all the way to the target. Pull out the arrow and shoot again.
cant bow to the side more or less than before, or turn the body a little to the left or right. Changes in body position required to change the trajectory of an arrowat such a distanceso small that
you may not even notice how it all happens. And as long as you shoot arrows in the correct technique, your body will most likely do all the necessary
amendments.
Continue until you early do not place 9 out of 10 arrows in a 5 cm circle from a distance of one and a half meters And
until you hit the target exactly, at least,
500 times.
Given the number of hits from this distance, it is safe to say that you fired enough arrows,
having noticeably improved his shooting technique and developed visual memory, so now every time you
shoot from a given distance, your body
will guide the bow on its own. This is very importantlearning phase, so don't be tricky and don't overwork yourself.

Never mind that on a lucky release 500 arrows will take you a lot of time and effort; the ability to learn and the speed of development of skills for each archer is different. Most importantly, do not forget to follow the correct shooting technique. hard work and a positive attitude will definitely bear fruit. You may not want to stop there after 500
hits and continue practicing to become more confident with the bow and improve your visual memory. But how
only you successfully release at least 500
arrows and you will feel confident, go to the second phase.
PHASE TWO
This exercise is similar to the first phase, with one exception - this time you will shoot from a distance of 3m (i.e. the distance is doubled). At first glance it seems that the jump is not that big, however, after firing the first few arrows, you
you will quickly realize that it is not so simple.
Don't forget to warm up before each archery session and practice correct shooting technique with your eyes closed.As with the first phase, keep practicing untiluntil you start laying 9 out of 10 arrows at the target and hit
target at least 500 times. Fire only one arrow at a time and take your time between shots. Working out the correct shooting technique and the formation of visual memory are the main goals this exercise. After hitting the target at least 500 times and feeling more confident with the bow at that distance, move on to the next phase.
PHASE THREE
At this stage, you again double the distance between you and the target, i.e. now it is already 6 m. And again the same requirements. Warm up and do the exercises in the right way.
shooting technique with closed eyes before each lesson. Most likely, you will decide that a 5-centimeter circle looks too small at this distance. Right! The smaller the target, the more focus and concentration you will need to hit it. You will also notice that the overall visual image has also changed. Now with peripheral vision, in addition to the target, you will begin to notice more foreign objects. However, do not forget that the main thing for you is the target, so focus your eyes on it so that everything else around you goes to
second plan. Nothing has changed except the distance. Now you can shoot three arrows so you don't have to constantly run after each one. And, as before, continue until you begin to stack
hit the target with 9 out of 10 arrows from a distance of 6 m. And don't worry if it takes you a long time. This educational process, and over time you will definitely succeed. Once you feel more confident at this distance and hit the target at least 500 times, move on to the next phase.
PHASE FOUR
Again, double the distance to the target - up to 12 m. It is better to shoot from such a distance at a target set not at chest level, but lower - at waist level. Zoom in with black marker
mug size up to 10 cm. Do not worry, 12m is not so
long distance. Just keep using proper shooting technique and warming up and doing everything. necessary exercises before each archery session. The conditions for the transition to the next phase are the same: as soon as you start putting 9 out of 10 arrows on the target and hit the target at least 500 times, you are ready for the next exercise.
PHASE FIVE
 |
At this stage, the distance between you and the target will not increase as much as in the previous phases, because right now you are approaching the distance, which for some archers becomesthe maximum range of accurate target destruction.Now you will shoot from a distance of 18 m. Again, the same requirements for this exercise. At this stage, you will only need
The technique of archery is the basis of an accurate hit on the target. Without hard training, even the most expensive compound bow will not help you shoot accurately. And experienced hunters-archers accurately shoot even from simple in design, but difficult to operate, from straight and recurve bows.
Rack
Proper stance is the first step to accurate shooting. There are three main racks: open rack, side rack and closed rack. With a closed stance, the bowstring can injure the shoulder or arm, so it is rarely practiced.
The open stance is recommended for beginners in archery. The technique is as follows: feet shoulder width apart. Right leg carried forward, the toes of the feet should be to the line of the shot at an angle of 45 °. With an open stance, the target is best seen, the bowstring does not injure the hand and the hand with the bow has greater freedom of movement.
The side stance is practiced by experienced hunters. Feet shoulder width apart and in line. This position aligns the body along the line of the shot, turning the head becomes natural. So, it is more convenient to follow the target. Part of the body weight should be transferred to the left leg. This stance is also not traumatic.
grip
The next component of the archery technique is the position of the hand on the handle - the grip. It comes in three types: high, medium and low. The low grip is most comfortable for hunters. The brush experiences minimal stress. This means you can aim more accurately and longer.
It is impossible to squeeze the bow with force. He should only lean on the point between the index and thumb of the holding hand. The point of contact takes the weight of the bow when pulling. And the rest of the fingers should loosely cover the handle. If you strongly squeeze the handle of the bow with your whole palm, there will be a swing that knocks down the aim.
Arrow placement and proper bowstring tension
Having chosen a stance and grip, raise the bow in front of you and take an arrow. Put it on the bowstring without touching the shelf with plumage. Thread the bowstring into the cut of the arrow shank, then place the shaft on the shelf.
The next step is to apply the brush to the bowstring. When manually descending, use the middle, ring and index fingers. The ring and middle fingers should be under the arrow, and the index finger should be above it.
Beginners are recommended to completely capture the bowstring with the front phalanges of the fingers. Experienced hunters grab the bowstring for a clearer release with the very tips of their fingers. The bowstring must be hooked with the fingers like a hook, but not squeezed in the fingers.
It is much more convenient to use a mechanical release. For release tension, a bowstring or trigger loop is hooked under the arrow socket.
Stretching the bowstring
Holding the string, raise the bow towards the target. At the same time, raise the elbow of the working arm parallel to the ground. The shoulders and arms of the hunter should line up in a single line. Gently twist your elbow so that your hand does not fall under the bowstring. The bowstring must be pulled back evenly.
Aiming
During aiming, the pip-site reticle is aligned with the reticle and the selected target. When hunting, you need to aim quickly, since it is difficult to hold the bow in a taut state for a long time - vibration will begin. When shooting without a pip site, the crosshair moves slightly to the right or left of the string and aligns with the target.
Withdrawal of the bowstring and stretching
This The final stage shot, providing well-aimed stable shooting. The bowstring should be released in a relaxed, smooth manner. When shooting without a release, you just need to relax your fingers. When using the release, you need to smoothly press the button.
After the withdrawal of the bowstring, the body must continue the natural movement that was started during the shot. It is necessary to continue building up pressure on the bow handle in the direction of the shot and pull back the hand that held the arrow. This is stretching.
In order to properly finish the shot, it is very important to continue the “trigger” hand moving backwards when reaching. In addition, it is recommended to accompany the flight of the arrow with the eyes, even after the shot, focusing on the target.
Only exact observance of all stages will allow you to make targeted shooting. To achieve automatic movements, you will have to constantly train, regardless of hunting experience.
It is customary to analyze the technique of archery according to the following elements: preparation, grip, capture, bow tension, release (descent), breath control, aiming.
fabrication
Leg position
Body position
grip
The position of the hand holding the bow
capture
Bow tension
Release (descent)
Breath control
Aiming
Archery - this is the process of performing a complex motor action, the main elements of which are drawing the bow and releasing the bowstring. optimal how to perform this movement. Each archer has his own shooting technique, since all people differ in physical development, body structure, body weight and other parameters. Technical elements when shooting from a sports classic bow different from shooting techniques compound bow.
MANUFACTURING.
The archer's position is determined by the position of the legs, torso, arms and head of the athlete. Consider each element of the manufacture of the archer separately.
Leg position.
The archer (right-handed) usually stands with his left side to the target. The legs, which are the support for the whole body, because shooting is carried out in a vertical position, must be straightened. The tension of the corresponding muscles creates a minimum of internal degrees of freedom for lower extremities and the lower part of the body, i.e. movements in all joints (ankle, knee, hip) should be minimal. This is prerequisite maintaining balance and reducing vibrations to ensure the immobility of the shooter-weapon system. Naturally, the overstrain of the muscles of the legs and torso is unacceptable, because. this can cause discoordination in the basic movement control system.
The feet are located approximately shoulder-width apart from each other, the socks are slightly turned to the sides. The position of the feet must be constant, not change from shot to shot. It is determined by the location of the characteristic points of the feet (anterior and posterior points of the axis passing through the middle of the heel and the middle of the big toe).
There are three main manufacturing options: open, lateral, closed.
The choice of one or another option depends on the individual characteristics of the archer. These options mainly differ in the position of the body relative to the target line, which is determined primarily by the position of the feet.

The figure shows the position of the legs in open, side and closed types of manufacture.
The most common at present is the lateral manufacture.
All three types of preparation in archery are divided into preliminary and main.
Preliminary preparation consists in performing movements that ensure the correct positioning of the feet relative to each other and the orientation of the body relative to the target line. The head is usually turned slightly towards the target. The bow is either held in the air with the left hand lowered along the body, or rests lower shoulder on the left foot and held with the left hand bent in elbow joint.
The main preparation consists in performing the necessary actions for the shooter to assume a position with a drawn bow up to touching certain (individual) orientation points on the face (chin, nose tip, etc.) with the bowstring.
Body position.
In the preparation of an archer, this position can be estimated by a conditional vertical axis. Depending on individual characteristics, this axis can be located strictly vertically or with a slight forward inclination. With this position of the torso, it is easier to reduce unwanted touch and pressure of the bowstring on the shooter's chest.
 The position of the body must obey the main requirement - to create a biomechanical support and maintain it throughout the entire time of the shot. In this regard, the work of the muscles of the body should be as variable as possible, which requires constant training.
The position of the body is determined by the location of its characteristic points (abdomen, pelvis, as well as the axis passing through the hip joints).
Head position.
The shooter's head is turned to face the target. The muscles of the neck that hold the head upright and are involved in turning the head should not be overly tense. Otherwise, this can disrupt blood flow, lead to excessive tension in the muscles of the body and the arm that performs the bow tension, which, in turn, can cause discoordination of movements and, as a result, the occurrence of errors. The position of the head must be uniform and not change during the course of the shot, otherwise it may adversely affect the quality of aiming. 
The distance between the eyes (the leading eye) and the shank of the arrow must always be constant, so the teeth must be tightly clenched. The points (point) of contact between the bowstring and the face (tip of the nose, middle of the chin, to the right of the face) must be constant.
The lower jaw should be in close contact with top brush and fingertip, because the hand that performs the bow tension moves along the jawbone and the same place of contact serves as a constant reference point for the correct movement of the hand.
The leading eye should be located at a certain (equal) distance from the plane of the shot so that the bowstring does not obscure the front sight.
The position of the hand holding the bow.
The left (usually) hand holding the bow is raised towards the target, straightened and located at an angle of approximately 90 ° with respect to the axis of the spinal column (the change in this angle depends on the shooting distance).
The arm should be straightened and fixed in the wrist, elbow and shoulder joints. This fixation is carried out due to the simultaneous tension of the antagonist muscles for each joint. The hand holding the bow actively resists the increasing pressure of the bow as it is drawn. The hand, forearm, and shoulder, while drawing and holding the drawn bow, must form a rigid system, together with shoulder girdle and head.
Grip.
The position of the hand is determined by the chosen method of holding the bow ( grip). To hold the bow, there are several types of grip, which differ in the location of the palm and fingers on the handle of the bow: low, medium, high.
Each of them has its own advantages and disadvantages. Common to all types of grip is that the bow handle is inserted into the "fork" formed by the thumb and forefinger.

With a low grip, the back of the handle rests tightly against the base of the thumb, and the side fits snugly against the muscles of the palm. The conditional axis of the wrist joint is located at an angle of 45 ° to the plane of the shot. The middle part of the hand is located approximately at an angle of 120 ° to the forearm. With a low grip, the contact area of \u200b\u200bthe palm with the handle is the largest.
With an average grip, the contact area is significantly reduced due to the fact that the hand is straightened, the angle with respect to the forearm is approximately 180 ° and therefore there is almost no bend between the hand and forearm. The base of the thumb and the bottom of the palm do not touch the handle of the bow.
At high grip the hand is somewhat lowered in relation to the forearm, and the area of its contact with the bow handle is even more reduced.
The position of the forearm is mainly dictated by the need to ensure the free passage of the bowstring when fired. To do this, the shoulder must be pronated in the shoulder joint so as to create a minimum of forearm surfaces protruding towards the plane of the shot. the articulation of the forearm with the shoulder must be rigid, these two links form a single whole. Due to internal forces, it is necessary to eliminate possible degrees of freedom in the elbow and wrist joints.
Right hand position.
This is the hand that makes capture, retention and release bowstrings, and also participates in bow tension.
Capture.
The archery grip is a way of holding the bowstring and can be deep or medium.

The most common is a deep grip. It is characterized by the fact that the gripping hand is perpendicular to the string (before drawing the bow). The bowstring is grasped with three (sometimes two) fingers in such a way that the load on them is as uniform as possible, and the bowstring itself is located on the extreme bend of the distal phalanges of the fingers (index, middle, ring). The rest of the fingers and palm should be as straight as possible. The thumb and little finger should be as relaxed as possible. With an average grip, the string is located approximately in the middle of the distal phalanges of the fingers. The shank of the arrow is placed between the index and middle fingers and must not touch or pinch when drawing the bow and releasing the arrow. For this purpose, an instep support is installed on the fingertip.
After the grip is completed, the left hand raises the bow, while the right hand, being in a half-bent state, holds the bowstring.
Before the start of tension, the right shoulder and forearm are located in a horizontal plane, while shoulder joint if possible, it should be lowered, the elbow of the right hand is slightly raised in relation to the longitudinal axis of the arrow.
At sports shooting from a compound bow, a special bow is usually used to capture and hold the bowstring. technical device called a release.
In this case, the release, depending on the design, is either held by the fingers of the right hand (T-shaped), or fastened with a leather strap on the forearm (carpal).
Bow pull.
The movement of all links of the right half of the upper limb belt must be coordinated so that the string moves in the plane of the bow. When it is pulled, the position of the fingers on the bowstring and general position brush relative to the plane of the shot should not change.
The tension of the bow is carried out simultaneously by the muscles of the right arm and back. The initial draw phase (first phase) of the bow is carried out mainly by the muscles of the right hand. The middle (second) and especially the final (third) phases of drawing the bow are performed mainly by contracting the back muscles, bringing the shoulder blade to the spine.
The final phase of drawing the bow is the most important. just before it begins, the hand involved in drawing the bow passes (or is fixed, depending on the type of technique) through certain points of contact located on the face (the tip of the nose and the middle of the chin or just the chin, etc.). In the event that the brush is fixed under the chin, it has some varieties depending on the position of the fingers: submandibular, maxillary, cervical.

Currently most widespread received submandibular fixation, when the hand is under the chin, the thumb and little finger are as relaxed as possible. After fixing and refining aiming, the hand continues its movement along the jawbone due to the contraction of the muscles of the back and arm. This movement after the fixation is done is commonly called the “stretch”.
In another version of the technique, the right hand touches the face at the same points (the main thing is that these landmarks are always constant), but does not stop, and as the aiming becomes more precise, it slowly moves back along the jawbone, i.e. the effort to draw the bow does not stop.
During the final phase of drawing the bow, when the hand, under the chin, moves back along the jawbone due to the contraction of the muscles of the arm and back (the main work in this phase should fall on the muscles of the back), the arrow will come out from under the clicker, a click will be heard and release takes place. The main requirement for the final draw phase of the bow is that it must continue without stopping after the clicker click and at the moment the arrow is released.
When a compound bow is drawn, its character changes. this is due to the design features of the weapon (bow). The main effort to perform the draw develops in the initial (first) phase (70% of the draw force of the bow). In the second phase, there is a rather sharp decrease in the magnitude of the force (30% of the bow tension force). When performing the third (final) phase of drawing the bow, the muscle tension is much less than in its first phase. It is approximately 30% of the bow tension force and practically does not change as the hand approaches certain fixation points on the face.
Given these features, it is necessary to pay special attention to the position and work of the hand holding the bow, because. it is subject to increased requirements for maintaining a reliable emphasis on the bow both during the first and during the second phases of its tension.
It should also be noted that in sports shooting from a compound bow using an opener, the right hand in the final phase of the tension, as a rule, is located to the right of the face and touches the right cheek, and is not located under the jawbone, while the pull as such is not performed. However, the tension of the muscles of the back and arm, performing the tension of the bow during the fixation of the hand and the descent (release) of the bowstring, should be sufficient to hold it, and even its increase should be subjectively felt. This can prevent uncontrolled relaxation of the muscles of the back and arm and the "surrender" of the right arm forward.
The movement of the trigger finger (pressing the release button or the disconnector trigger) must be smooth and autonomous so as not to cause an uncontrolled increase in tension on the muscle groups directly involved in this movement.
Release(descent).
Descent - This is the release of the bowstring from the grip. It is performed during the final phase of drawing the bow. The main requirement for release is instantaneous, simultaneous and complete relaxation of the fingers holding the bowstring. If this condition is met, the bowstring, as it were, opens completely relaxed fingers and leaves them with a minimum deviation from the plane of the shot.

The relaxation of the fingers and the release of the bowstring from the grip occurs at the click of the clicker, however, one must always remember that the tension of the bow after the click of the clicker and at the time of the release should not be interrupted.
In the case of using a release, the fingers of the hand that draws the bow and holds the bowstring are not directly involved in its release. The release in this case can be called a descent, because. depending on the design of the release, the archer presses the thumb or forefinger on a special release button or trigger that activates trigger mechanism to release the string.
When using the release, it is possible to achieve a minimum deviation of the bowstring and bow from the plane of the shot, and due to this, the deformation of the arrow is reduced, which ultimately has a positive effect on the accuracy of fire.
Breath control.
When making a shot, the archer strives for the best stability of the "shooter-weapon" system. For this, it becomes necessary to stop breathing for the duration of its execution, i.e. exclude unwanted movements chest. Hold your breath for 10-15s. is not difficult even for an untrained person. This time is enough to complete the shot. As the bow is pulled and immediately in front of it, breathing becomes more and more shallow and the archer lingers on a natural respiratory pause, and the stop should be at a moment a little less than half an exhalation. This is the most rational and natural cessation of breathing, in which there remains a small tone of the respiratory muscles, corresponding to the general tone of the body.
The level of oxygen in the blood and its supply in the lungs is quite sufficient for the normal functioning of all body systems for 10-15 seconds. Moreover, as training progresses, the reflex threshold of the urge to inhale moves away with a decrease in oxygen in the blood.
With such a breath hold, the archer does not experience oxygen starvation, i.e. the state of hypoxia does not occur, and therefore there is no need for hyperventilation of the lungs. In the case of hyperventilation of the lungs, an undesirable phenomenon for the archer of oversaturation with blood oxygen can occur, which causes slight dizziness, uncoordination of movements and loss of stability.
Aiming.
The aiming technique consists in pointing and holding the front sight in the aiming area in the center of the target (as a rule). The front sight can be rectangular, trapezoidal, in the form of a point, round and annular. During aiming, the archer mainly sees the sight, bowstring and target. The device of the eye does not allow you to simultaneously see the aiming device, the bowstring and the target equally clearly; three disparate objects. Therefore, the eye is focused in such a way that the front sight is most clearly visible, the target is less clearly, and the bowstring is even less clearly. The bowstring can be to the right or left of the front sight, which is of no fundamental importance. The main requirement is that the bowstring should always be on the same side of the front sight and at the same distance from it.

When aiming with a classic bow, it must be remembered that the hand that performs the bow tension must touch the jawbone and slowly move back due to the contraction of the muscles of the arm and back. The mouth must be tightly closed.
These actions must be controlled, otherwise the distance between the eyes and the arrow may change, which will lead to an error in aiming.
When aiming with a compound bow, as a rule, a level is used to control the position of the bow in the horizontal plane, an optical sight and a pip-site (a special device with a small hole that is attached to the bowstring at the level of the eye involved in aiming). So we can talk about a certain combination of a diopter with optical sight. When the bow is fully drawn, the shooter's eye, the center of the hole (diopter) of the pip-site, the front sight and the aiming point are in a straight line.
The line formed by the pupil of the eye, the front sight and the aiming point is called aiming line.
target area - is the area of a circle bounded by a circle centered on the aiming point. It can be more or less depending on the degree of stability of the bow position. The higher the skill level of the archer, the smaller the area of fluctuation of the front sight.
The position of the head should provide the most advantageous position of the eyes. The muscles of the neck should never be overstretched, which can lead to discoordination of actions in the final phase of drawing the bow.
Article from the site http://www.archery-sila.ru
In this article I will try to present the basics of archery techniques for beginners. I must say right away that there are various shooting techniques, but I will focus on the one that I use myself. In addition, I note that when shooting, a traditional rather than a sports bow is used, without a special handle and a central battle. It should also be borne in mind that the material is written for right-handed people.
Archery Technique for Beginners: Drawstring
Common mistakes in archery
Each shooter selects for himself the features of his stance, grip, the point to which he pulls the bowstring, aiming methods, however, there are a few simple rules that we outlined below. In the future, the shooter must strive to ensure that his shooting technique is unchanged from shot to shot.
The first thing to do when shooting a bow is to get into a comfortable position. Before the shot, the archer becomes left side to the target, feet shoulder-width apart or slightly wider. The archer stands with his toes on a conditional straight line that leads to the center of the target. Such a stance allows the shooter to stand confidently and steadily, to relax between shots (photo 1).
photo 1
With his left hand, the archer grabs the handle of the bow approximately in the middle (as a rule, there is a special grip on the bow (photo 2). The hand that holds the bow in weight experiences the elasticity of the bow when pulling and lowering the bowstring. If the archer’s left hand trembles, it shifts at the moment of shooting before the arrow has left the bow, then it will be impossible to achieve accurate shooting.Beginning archers in medieval England stood for hours with a stick and outstretched left arm, getting its strength.

photo 2
The hand holding the bow should not interfere with the course of the bowstring, otherwise the shot will not only turn out to be weaker, but the shooter himself draws a painful blow to the hand. Therefore, the elbow joint must be moved a little to the side with a small rotational movement of the hand or the bow should be moved slightly to the right with the brush, but this can complicate the shot itself, due to additional load on the hand and thumb (photo 3).

photo 3
The arrow is placed on the bowstring, holding it by the shank (in no case by the plumage !!!) so that the guiding feather is from the bow (if the arrow has three feathers) and placed on the hand holding the bow (photo 4). Sometimes, so that the arrow does not fall off the hand, archers hold it a little with the index finger (the finger must be removed at the time of the shot) or slightly tilt the bow, twisting left hand clockwise.
photo 4
The position of the fingers that hold the arrow is shown in the photograph (photo 5). Forefinger above the arrow, and the middle and nameless - below it. The string lies between the first and second joint of the fingers. In this case, the fingers pull the bowstring, and the arrow is only slightly held. The load on the fingers should be uniform.

photo 5
Before the shot, the archer stands up, checks its correctness (the position of the body, arms, legs and head), lays the arrow, evaluates the conditions for the shot. The shooter must not forget that his actions in preparation for the shot and the shot itself must not diverge from shot to shot. When a novice archer shoots, he often rushes and shoots without standing confidently, twisting his body, etc. Such mistakes prevent him from making a good shot.
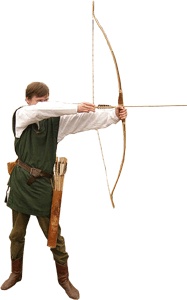
photo 6
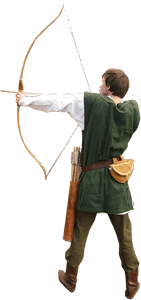
Having accepted initial position before shooting, the shooter raises the bow to shoulder level, straightening the left arm (photo 6), and then stretches the bow until the string touches the front surface of the chin (some people pull the bow to the ear). At the same time, the arm is bent at the elbow joint in such a way that the hand is as close as possible to the neck, and the forearm and shoulder, forming an acute angle, are almost in the same horizontal plane (photo 7). Stretching the bow is carried out only by tension of the rear beams deltoid muscle and muscles (the shooter seems to bring the shoulder blades together), retracting the shoulder blade back. The nail phalanges and the flexors of the fingers holding them perform the function of capturing the bowstring.

photo 7
The draw of the bow occurs along the hand that holds the bow to the so-called "anchor point", that is, the point to which the shooter pulls the bowstring and makes a slight delay before shooting.
One of the methods of "anchoring", which is also used by the author of these lines, is a method in which the bowstring is pulled to the middle of the chin, the thumb of the right hand lies under the jaw, the jaws are compressed (photo 8).
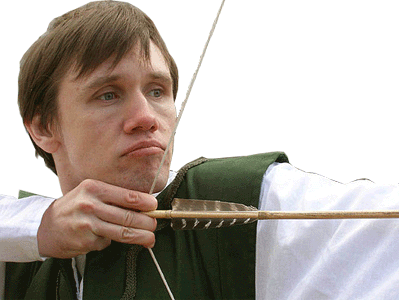
photo 8
Unlike a sports bow, a historical bow does not have special sighting devices. It is also impossible to aim at the projection of the bowstring, since in a peripheral bow, this will not help, moreover, when pulling the bowstring to the ear, it is physically impossible. The author of these lines uses the so-called "intuitive aiming" when shooting. Intuitive aiming is similar to when a person, for example, throws a stone at a target. The brain itself calculates the desired trajectory, however, accurate shooting with intuitive aiming is achieved by constant practice and regular shooting. In addition, the shooter must constantly remember about correct stance, grip and breath to maximize shooting conditions.
Continuing to pull the shoulder blades towards each other, the shooter relaxes the fingers holding the bowstring, making a shot. At the same time, the hand holding the bow must be strictly fixed. Usually, when shooting, novice shooters make two typical mistakes:
- Before the shot, the hand holding the string follows the string before the fingers open, which weakens the shot itself.
The left hand holding the bow is not fixed, and then when the bowstring is lowered, it begins to go to the side even before the moment when the arrow leaves the bow. As a result, the arrows go to the left.
Before firing, the shooter must calm his breathing. The shot itself is made on a half-exhale.
|
photo 9 |
photo 10 |

After a shot, there is one more step that beginner shooters often forget about when jumping straight into the next shot - following. At this stage, the shooter tracks the arrow, makes adjustments to subsequent shots and corrects errors. At the moment of following, the archer maintains his posture for some time after lowering the bowstring, analyzing the shot made. Now you can move on to the next shot.


