Many people, trying to sit on the twine, can injure their inguinal ligaments or even tear them. There are many rules on how to sit on the twine. But do not think that this can be done quickly and easily. With hard training, it will take about three months before you get closer to your goal.
Remember the basic rules:
- Almost anyone can sit on the twine, but there are contraindications. Do not try this if you have a bruised leg, a fractured pelvis or leg bones, an exacerbation of spinal disease, or hypertension.
- You need to stretch with the help of exercises that will not cripple you. Be careful not to damage your ligaments. You need to stretch gradually, not abruptly.
- Before you begin to perform stretching exercises, the muscles need to be properly warmed up. You can jump or run for 10-15 minutes. A warm bath also helps in this matter, after which the muscles will stretch noticeably better. Only after a warm-up can you start the exercises themselves.
1. The main exercise that helps to sit on the twine is swinging your legs. Stand on one leg so that it bears the entire weight of the body. Raise the second one as high as you can. It's okay if the leg does not rise above the waist yet, this will change over time. Do swings with straight legs and a straight back.
2. Put your foot on a table or any other surface that will be flush with the belt, and bend to the floor. Then change your leg. If such an exercise does not work right away and it will hurt - do not worry, it will work out next time, the most important thing here is the regularity of classes.
3. Now do the exercises, simulating an attempt to sit on the longitudinal twine. Begin to smoothly push your leg forward until you begin to feel a stretch in the muscles in the groin area. Now lower your pelvis as low as possible, holding this position for 15 seconds.
4. After the longitudinal try to sit on cross twine, spreading your legs to the sides until you begin to feel the stretching of the muscles. After that, gradually, without jerking, lower the pelvic region down. Accept stable position and try to stay like that for 20 seconds. As you feel the stretch improve, lower your pelvis lower and lower.
Don't bounce, just try to stay at the lowest point for as long as possible. The main thing is that your ligaments and muscles do not overstretch.
5. You can add other stretching exercises to these exercises. Keep in mind that to achieve the result you need to practice at least 30 minutes a day. In this case, in a month progress will already be visible.
8 years ago Elena started pole dancing. Stretched from scratch, gained experience and now trains students. Its teams participate in regional competitions and win prizes.
Elena told me how long it takes to sit on the splits, how to maintain stretching and showed me the basic exercises.
How stretch works
The fact that a beginner experiences discomfort during stretching and cannot reach the twine does not mean that he is “not naturally flexible” or “muscles are short”. Discomfort and tight muscles are simply a protective reaction of the body to unusual loads.
In the muscles there are "fuse" receptors - proprioceptors. They are stretch sensitive. When we sit down on the twine, the “fuses” signal the brain about the danger and the brain reacts by blocking the muscles. At this very moment, it seems to us that we have reached the maximum and cannot stretch further. This myotatic reflex is an important protective reaction of the body that protects muscles from injury.
Reflex arc of the spinal cord. Ray Long Anatomy for backbends and twists.
If you continue to stretch, then the tendons will begin to stretch, in which there are also “fuse” receptors. Tendons are almost inelastic and can be injured much faster than muscles. Our brain knows about it. As soon as the signal from the tendon receptors arrives, the brain prioritizes and unblocks the muscles as a more elastic organ. At this point, we stretch a little more, even though a few seconds ago we thought it was impossible.
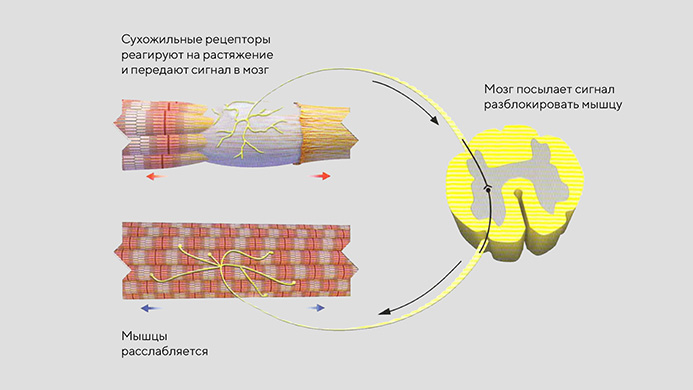
Reflex arc of the spinal cord. Ray Long "Anatomy for hip openers and forward bends".
If you stretch regularly, the “fuse” receptors get used to new conditions and give a signal later and later. Therefore, gradually the twine becomes deeper and deeper.
During stretching, the muscles enter new conditions, which they gradually get used to. Therefore, each increase in amplitude is accompanied by discomfort.
The benefits of twine
Twine is most often perceived as the ultimate goal of stretching. And if we consider the desire for twine as physical activity, take into account all the nuances and rules of stretching, then you can keep the body in good shape.
The benefits of general stretching of the human body are obvious:
- relieves tension and spasms of muscle fibers;
- increases muscle tone and elasticity;
- improves joint mobility;
- feeds muscle tissues and joints by increasing the flow of lymph and blood;
- makes the body more flexible and resilient;
- preserves health and prolongs youth.
Preparatory exercises for splits train the muscles of the back, strengthen and stretch the spine and increase the mobility of the hip joints.
Where to begin
In ordinary life, we walk, sit, lie on the couch - all these actions do not imply stretching. Therefore, in the first lessons, the muscles, fascia and tendons are not yet ready for a sharp stretch. Do not try to sit on the twine right away on the first day.
Start with small loads and a comfortable amplitude. Gradually increase the number of workouts, repetitions, stretch time and amplitude. You can use the set of exercises recommended by physiologists Arnold Nelson and Yuko Kokkonen in their book Anatomy of Stretching Exercises.
Start with a small amplitude and gradually increase it
How to breathe correctly
Splitting is easier if you breathe correctly. To do this, you need to follow two rules: do not hold your breath and stretch on the exhale.
During stretching exercises, beginners involuntarily tense up and hold their breath in the moment before the greatest stretch. This is part of the defensive response that comes from anticipating pain and discomfort. Muscles, fascia, tendons, and the whole body are tense. And for comfortable stretching, relaxation is necessary.
If you caught yourself thinking that you were holding your breath - do not rush to finish the exercise, stop in a comfortable position. Exhale and inhale again. Slowly and deeply at first, then adjust your breathing to your usual rhythm. When you breathe evenly, remember the second rule - stretch on the exhale.
During exhalation, the load on the ribs, muscles and abdominal wall decreases. This local relaxation helps to relax the whole body and facilitate stretching.
Do not hold your breath and stretch as you exhale. It makes stretching easier.
How to sit on a transverse twine
Elena on the cross twine
Warm up
Before stretching exercises, you should always warm up. By warming up, we increase blood flow and increase muscle temperature. Warm muscles are easier to stretch and more difficult to injure.
Warm-up exercises are divided into general and special.
- Are common needed to warm up the whole body. This, for example, jogging and jumping rope.
- Special- warm up individual groups muscles. For twine, we will need to warm up the muscles of the hip region.
Before stretching, we can jump rope for a minute, and then proceed to special exercises. You need to warm up so that you sweat a little, but do not get tired.
1. Spread your legs wide, turn your toes to the sides 2. Squat down so that your thighs are parallel to the floor, and your knees are in line with your heels 3. Repeat the exercise 10 times
1. Spread your legs wide apart, do not bend your knees 2. Bend to the floor 10 times, your back should remain straight
1. Without changing position, bend over to one leg 2. Hold in this position 3. Bend over to the second leg and hold again 4. Bend over 10 times to each leg
1. Lie on the floor 2. Bend one leg at the knee 3. Make 10 rotational movements in one direction, then in the other 4. Repeat the exercise with the second leg
Warm up before stretching. Warming up makes stretching easier and reduces the risk of injury
Stretching
Stretching exercises differ from warm-up exercises in that they gradually increase the range of motion. Simply put, it is with their help that you can sit on the twine.
1. Sit on the mat and bend your knees 2. Spread your knees apart, connect your feet 3. Grasp your feet with your hands 4. Without rounding your back, tilt your body forward, press your knees to the floor 5. Hold in this position

1. Lower the knee of the left leg to the floor 2. Place the foot of the right leg on the knee of the left leg 3. Press the knee of the right leg against the foot of the left leg 4. Stretch forward, the back should remain straight 5. Hold in this position 6. Repeat the exercise on the other leg
1. Sitting on the mat, spread your legs in different directions 2. Put your hands in front of you and roll your pelvis back and forth. It is important to roll the pelvis, not the shoulders
Landing
This is an exercise from which you sit on the twine. It must be done after the entire stretching complex. You won't be able to sit down for the first few sessions, but each time the floor gets closer and closer.

1. Push yourself against the wall so you don't fall back 2. Start to slowly spread your legs apart 3. Lean on the block if necessary
Control yourself: the back is straight, the legs are extended in one line.
How to sit on a longitudinal twine

Warm up

1. With one hand, hold on to the wall 2. Rise on your toes 3. Lower yourself to a full foot 4. Do 2 sets of 10 times

1. Hold onto the wall with one hand 2. Bend your leg at the knee 3. Bent leg do 10 rotational movements in one direction, then in the other 4. Repeat the exercise with the other leg
1. Stand with your feet shoulder-width apart, back straight 2. Squat so that your thighs are parallel to the floor 3. Return to initial position 4. Repeat 10 times

1. Get on all fours 2. Raise one leg bent at the knee, thigh parallel to the floor 3. Raise the leg 10 times 4. Repeat with the other leg
During the longitudinal split on the front and back legs, we use different groups muscles. Therefore, exercises for the front and back legs need different ones.
Stretching
Thanks to stretching exercises, it will be easier for you to sit on the longitudinal twine by gradually increasing the range of motion.
front leg
1. Sit on the floor, stretch your legs 2. Bend your left leg 3. Place your right hand on your right knee 4. Left hand put on the right ankle 5. Bend over to the leg 10 times, the back should remain straight 6. Repeat the exercise on the other leg

1. Without changing position, place your palms on the floor on both sides of the leg 2. Stretch along the leg as far as possible, the back should remain straight 3. Hold in this position 4. Repeat the exercise on the other leg
1. Without changing position, right hand put behind you 2. With your left hand, take right leg behind the foot 3. Straighten the right leg and pull it towards you 4. Hold in this position 5. Repeat the exercise on the other leg
1. Take cubes or books for support 2. Kneel down, stretch your right leg in front of you 3. Place the cubes on both sides of you and lean on them with your hands 4. Bend over to your leg 10 times, your back should remain straight 5. Repeat the exercise on the other leg
1. Without changing position, place your palms on either side of the leg 2. Bend over to the leg 10 times, the back should remain straight 3. Repeat the exercise on the other leg
1. Without changing position, stretch along the leg as far as possible, the back should remain straight 2. Hold in this position 3. Repeat with the other leg
back leg
Control yourself: the back is straight, the heel of the back leg looks at the ceiling, the bones of the pelvis are in line.
How long will it take
Stretching requires from one month to six months. Don't compare yourself to others, because no two people are the same. For example, if your friend Masha at least once sat on the twine before the age of twenty-three, then she can sit on it again after a month of classes. For those who have never sat, it will take up to six months.
There will be periods when there is no obvious progress, but this is a normal phenomenon. You still sit down. Just at the very beginning, you will only overcome limitations. nervous system. For fascia, muscles and tendons, this stage of stretching is the norm. It will pass pretty quickly. When ten centimeters remain to the floor, the process will slow down greatly, because at this stage the tissues are already stretched to the maximum and they are elongating. You will just need to be patient.
All people are individual and stretching can take from one month to six months.
How to maintain results
The twine is stored for two weeks after the cessation of classes. Then it will be more and more difficult to sit on it, and if you do not resume classes, then in another two weeks the flexibility will return to entry level. Therefore, stretching must be maintained. To do this, you need to stretch at least twice a week.
You can do one intensive and one supporting complex.
- Intensive- the one during which you sat on the twine.
- supportive- the one you did the first week.
Exercise twice a week to maintain your stretch level
Restrictions and contraindications
If flexibility and stretching are initially not your strong point, but you want to sit on the splits, then it’s better to start under the close attention of the coach, so as not to stretch your muscles and discourage desire in the very first lesson. The most important thing in stretching the muscles is a gradual but regular approach. Do not try to squeeze the maximum out of yourself in the first week and set records of your own flexibility through pain.
Before you start stretching, check if your case is on the list of contraindications:
- injuries of the hamstrings and inguinal ligaments;
- spinal injury;
- the course of inflammatory processes in the musculoskeletal system;
- prolapse of the uterus.
memo
- Discomfort while stretching is normal. Muscles fall into new extreme conditions, to which they gradually get used.
- Start with a small amplitude and gradually increase it.
- While stretching, do not hold your breath and stretch as you exhale.
- Be sure to warm up before stretching.
- Stretching will take from one month to six months.
- To maintain the result, you need to stretch twice a week.
In the article, we examined how to properly stretch for twine. But Elena, experienced trainer, recommends not disregarding other muscles. We have prepared a selection for you training complexes which will help keep the whole body in good shape. Enter your email and click the download button ↓
All men and women are interested in the most pressing issue on the Internet, how to quickly sit on the twine at home for a beginner? What is twine - this is not just a beautiful pose, but a spectacular pose, thanks to which you will get a huge amount of benefit. For example, the one who can sit on the twine will receive nice shape body, legs, back, press, especially the oblique muscles of the press, which look very nice. Twine will also help you in improving the spine, urinary system and intestines. Therefore, gather your strength and start working at home. There is nothing difficult, we turn on our favorite series or music and begin to stretch.
After a while, you will be able to surprise your friends with your flexibility and improve your body. It is also worth noting that twine exercises very useful for young ladies who are planning a pregnancy.
So, what are the types of twine:
- sagging;
- Vertical;
- Transverse;
- Twine on hand;
- Longitudinal twine.
Longitudinal twine- the lightest type of twine. And that's all, because it involves those muscles that work with simple walking. You can sit on the longitudinal twine much faster than others types of twine at home.
How to sit on the twine for a month at home
Exercises for longitudinal twine at home
Exercise 1
First exercise This is the pose of a runner. Before starting a workout, always warm up well with regular exercises. Stand in front of you and take a few deep breaths and start working.
Lunge straight in front of you and place your right leg so that it is bent at the knee. It is important that the leg should be completely perpendicular to the floor. Palms must be rested on the floor. The head should look straight ahead or straight ahead. You should remain in this position for about two minutes. Then try to spring your palms so that the perineum is gradually tense.

Exercise 2
The pose is very effective and will give you a lot of pleasure. The hands up pose is a direct continuation of the runner pose. So, slowly straighten the body, bend the back, and straighten your arms in front of you. Try to reach as high as possible, but at the same time, without lifting your palms. Longitudinal twine exercises will help to effectively and quickly strengthen and stretch the legs and muscles of the perineum, which are very important before you sit on the twine. Also, the exercise is very useful for the spine. Breathe slowly, look straight ahead.

Exercise 3
This exercise is very effective in stretching the leg muscles. Also, do not forget that the split position must be done for each leg. Slowly lower your leg to the floor, and straighten the other back. Then, with your palms, try to rest against the lumbar region. Try to bend back deeper.

Exercise 4
Take a pose so that one leg is bent forward at the knee, and the other is straightened back. Place your palms at your sides with your fingers pointing towards each other. Straighten your elbows to the sides.

Exercise 5
This is a direct continuation of the above exercise number 4 for twine at home. Try to touch your chin to the floor.

Exercise 6
So, exercise number 6 is the conclusion of your workout to sit on the twine at home. Try to bring the knee of the back leg as close to the floor as possible. But do not forget that before this exercise you need to effectively warm up. The final pose is your attempt to sit on the longitudinal split, or try to sit as much as possible.

Cross twine exercises
Cross twine- This is a more difficult way to sit on the twine, but quite doable. Cross twine at home very good for health, it develops the muscles and joints of the pelvis. On time cross twine exercises the legs will take on a very beautiful shape and bring the lower back into a correct and healthy position.
The following cross twine exercise perfectly prepare the body until the very last pose. This position will not give in to you as quickly as the longitudinal twine, but if you train hard, then all your friends will be in shock, and the body will be healthy.
Exercise 1
Quite simple to perform is a deflection in the lower back. Spread your legs shoulder-width apart, and place your hands on your lower back. You need to stretch until you see your heels. If you want to pump up the press, then you need to put your hands on your stomach. But always be vigilant, if the body is not ready for stress, then let the stretch go a little.

Exercise 2
So take a break after the first twine exercises proceed with the second one. Take a deep breath and lean forward and only, then stretch your arms forward. The head should look straight ahead. Legs should be wide apart.

Exercise 3
The exercise is called a deep bend with palms on the floor. The legs should be so apart that you can fit your elbows and shoulders between them. Try to reach down as if you are reaching up. Do not rush to become a guru right away and become in this position in a couple of workouts. Do everything gradually so as not to harm yourself.

Exercise 4
When the muscles are ready for stretching, you can easily already do the exercise with an emphasis on the forearms.

Exercise 5
One of the hardest exercises is the squat. wide staging legs. Stand wide, raise your arms up. But turn the socks outward - in this way, the legs are very effectively stretched. Do a deep squat, but keep your back relaxed and even.

Exercise 6
You will not be able to perform this pose right away. Since it is a direct continuation of exercise five. Sit down in this position and stay like this for 30 seconds.

Exercise 7
Exercise is familiar to many since school. Side lunges. Slowly spread your legs, lunges on the left and on the right leg. The knee of one leg should be bent and the other should be fully extended. Perform 8-10 repetitions.

Exercise 8
Now we are approaching the twine itself. Spread your legs as far apart as possible. Then lean forward a little and keep your back exactly parallel to the floor. Then rest on your elbows.
Exercise is the last preparations for the transverse twine. Also in this position, you can rest your palms on the floor, and pump up your arms and abs.

Exercise 9
Before how do the splits, lower the perineum on the stomach and gradually straighten the pelvis, the socks should be pointing up.

It is important to remember that everything twine exercises at home very useful for the genitourinary system, intestines and spine. Well, and most importantly, twine is very beautiful and effective to change your appearance.
Liked? Tell your friends.
Of course, not everyone will be able to sit on the twine the first time, someone may need a week or a month. But by regularly repeating these exercises, you will improve your stretch and strengthen your muscles:
If the twine is something more symbolic than yoga
For someone, twine is nothing more than good stretch, healthy ligaments, yoga exercise. But for me, as someone who grew up on the action films of Jackie Chan, Van Damme and Donnie Yen, it was something much more important and symbolic. Already in my student years, I reproached myself for the fact that in the seventh grade, when I went to hand-to-hand combat, did not show due diligence to sit on the twine. And when I was 20 years old, it seemed that time had passed, that I was old and that it was not worth even trying to sit on the splits.
A miracle happened - right after university I went to study in China. This university turned out to have a very strong wushu school, whose adherents regularly take first place in all-China wushu competitions.
It's one thing when you live in a world of office workers on foot who don't really care about stretching, but it's a completely different thing when you find yourself in a training room where absolutely everyone spins somersaults, flasks and sits on a twine, even children. In such an environment, being the greenest, oldest and most non-technical student, you immediately somehow begin to reach upwards. This desire, as well as the advice of wushu players, helped me sit on the transverse split in less than a year of training. I have put their knowledge and experience into a list of recommendations for those who want to do the splits.
How do the splits. Instructions from Chinese wushu champions
- Forget about deadlines. There are no “by the New Year” or “two months in advance”. Rushing in stretching inevitably leads to injury.
- Less heroism. It is better to slowly and systematically move towards the goal for half an hour daily than rare, but shock workouts for several hours at a time.
- Get to know your body. Although we are all similar anatomically, each of us has its own characteristics: the structure hip joint, elasticity of muscles and ligaments. For example, with a varus deformity of the femoral neck, a person simply cannot physically sit on a transverse twine. Therefore, if any one method came up to your acrobat brother to sit on the twine, then it is far from a fact that the same method is suitable for you. During training, you must independently determine your problem areas that do not allow you to sit on the twine. For example, I had no problems with the popliteal ligaments, they stretched well. But the ligaments at the thigh were like wooden ones. So I paid more attention to them.
- Drink more water. When you drink enough, connective tissue slides over your muscles, but when there isn't enough water, fascia can stick to muscle fibers, reducing your range of motion.
- Start training gradually, gradually increasing the frequency of stretch marks. I started with one workout every two days and got to three workouts in a day.
- In the evenings, our joints and muscles become 20% more elastic, which reduces the risk of injury and allows us to achieve best results. In the morning, dynamic stretching can be done to relieve the feeling of stiffness and stiffness after sleep, but do not strive for feats immediately after waking up.
- Before stretching, be sure to warm up the muscles of the legs: run, do air squats and regular warm-up exercises within 10-15 minutes. By stretching on a warm body, you reduce the risk of sprains.
- Distribute the load. When you are sitting in a split, there is a temptation to sink closer to the floor at the expense of your knees. Remember: if your knees or back hurt while stretching, you are doing it wrong.
- There are two types of splits: dynamic (when you swing your leg - split is in motion) and static (sitting on the floor). It happens that a person can swing his leg to the state of a twine, but cannot sit on the floor in it. It also happens vice versa. These two types of twine complement each other, so they should be developed in parallel. Dynamic stretching must be completely controlled, without sudden, jerky movements, otherwise the swings may end in injury.
- When you stretch the sock should be pulled towards you, and not from yourself (as in ballet).
- When you are in static, you do not completely freeze, but continue with slight oscillatory movements - up and down, like a string - at a frequency convenient for you.
- Figure out how to let your feet slide across the floor. It can be both socks on linoleum, and shoes on the spitting of an ushuist.
- Be extremely careful when third parties offer to "help" you. No one but you can know what state your ligaments are in right now. The coach is not a psychic. How many stories have I heard about a coach who "accidentally" tore someone's ligaments there. As for me, all these paired stretching-stretching with the help of a partner have one goal - to make the process more interactive and complex. By and large, you don’t need anything for the twine, except for the legs and the floor.
- Relax. For the body, stretching is an unnatural exercise. When stretched beyond its normal range, the muscles automatically contract to prevent injury. Learn to relax and breathe evenly while stretching - this will help you deepen the splits faster.
- Stretch every day. Unlike strength training, after which rest and recovery are necessary, stretching does not require such breaks. To quickly sit on the twine, stretch every day, seven days a week.
- Use a hot shower. After a hot shower, your ligaments will be more pliable for stretch marks.
- Use a timer. Sitting on a twine put a stopwatch in front of you. Start small, like 30 seconds, and gradually increase the time. These measurements will also help you more clearly feel your progress. Instead of a timer, you can use your favorite music, in which you are guided either by words or by the beginning of the chorus.
- Sign up for some section where twine would be appreciated. For example, acrobatics, yoga, break dancing or martial arts. It doesn't matter if you know how to do the splits or just work in this direction. A person is a social being, so any "public" training, and even more so in a circle of like-minded people, will morally support you and give you additional motivation.
Each person may have his own favorite and more effective ways to stretch: someone will sit in a "butterfly", and someone will swing their legs more - that's why I did not describe any exercises here, you probably know them. And if not, then you know where to find them.
The most important thing - remember that with due perseverance, people sit on the twine at 30 and 40 years old, the main thing is to believe in yourself. When, after a few months, I finally managed to sit in my transverse twine, our main wushu player smiled at me and said: “功夫不负有心人”, which means “if you work hard, you will definitely succeed.”
Due to certain historically established customs, many activities in our lives are usually divided into “male” and “female”. Fitness is no exception in this regard - and therefore guys prefer to do boxing or iron pulling, and girls sign up for stretching and Pilates. Meanwhile, stretching for men is no less important than for women. Since the complexes of exercises for stretching muscles and ligaments not only help to keep yourself in shape, but are also directly related to male potency.
In this regard, it makes sense to figure out whether men need to perform flexibility exercises if they are engaged in power types sports? And if so, how quickly, starting almost from scratch, can you achieve more or less tangible results? What goals should you set for yourself - just not to let the muscles “turn sour”, or make a program that will allow you to? Is it possible to do without going to the gym and do stretching at home? Let's try to answer the questions.
For men, there is a direct relationship between sexual health and the development of body flexibility. There are at least three reasons for this.
- Stretching for men promotes active blood circulation in the pelvic region. As a result, the vessels receive enough blood - and an erection, in essence, occurs due to its sharp rush to the male genital organ.
- Developed muscles are the best protection against infringement of nerve fibers. After all, the source of this problem is the compaction and compression of the vertebrae, which occurs due to the weak support of the spinal column by the back muscles.
- The health of the body directly affects the psycho-emotional state - and after all, many problems of men in bed are connected precisely with the psyche. Moreover, the very first failure often causes an avalanche-like process of increasing fear before each subsequent sexual intercourse. And the transition to the use of drugs that enhance potency is definitely not the best way out of the situation, and the harm from this will be much more than good.
 How to do this or that type of stretching if you are a beginner? And do you need to immediately worry that without the ability to professionally sit on the splits and arch the bridge, your classes cannot be considered full-fledged? Of course, the benefits of twine for men are undeniable - however, this is far from the first and not the main step in the art of creating a flexible and strong body. It is much more important to start with basic tasks - improving blood circulation in the pelvic region and relieving stress from the spinal column.
This will be achieved by doing special gymnastics for beginners, the first lessons of which can be obtained in the fitness center from experienced instructors, or you can immediately start exercising at home (the benefit of photos and videos of all useful exercises easy to find online).
What tips should not be neglected when starting to stretch at home, in the gym or at the stadium?
- The main thing is warming up! You can not start to strain the "cold" muscles. The best option- Light cardio workout gymnastic exercises for joints for 10-15 minutes.
- "Hurry up slowly"! This catchphrase is the best suited to our task. Sharp movements during stretching are contraindicated - but slow and smooth, on the contrary, ideally help strengthen muscles and make ligaments elastic.
- Don't break the technique! Otherwise, pain and even injuries will begin to haunt you, and the effect of the classes will be much lower than we would like.
- Don't make it a competition! Your workouts are for you, not for the audience. No need to try to get ahead of someone or someone to prove something.
- Practice regularly! At least three times a week. And combine classes with proper nutrition, light jogging, cycling, swimming, or any other form of light cardio. If we add to this moderate power loads- the result will not keep you waiting!
Remember one more important thing - ANYONE can do stretching (with the exception of those to whom it is contraindicated due to serious violations of the body). The main thing is to increase the load gradually and do it with pleasure!
When is the best time to stretch?
In principle, you can perform exercises almost anywhere and at any time. And not only in an apartment, park or on the beach - but even while waiting for a tram or stuck in your own car in a traffic jam. There would be an opportunity and a little time!
Of course, some moments and places are more convenient for this, and experts recommend:
- give preference to the morning hours, before leaving for work;
- do exercises during breaks throughout the working day;
- periodically, about once every few hours, - subject to a sedentary lifestyle;
- with a feeling of muscle numbness;
- just like that, if you are still sitting, reading or watching TV.
Three Types of Stretches to Develop Flexibility

- Passive stretch. The slowest type, suggesting complete control over the muscles. To do this, the application of force must be long-term and external - that is, provided by a simulator, a training partner, or some kind of load. Its purpose is to stretch the ligaments as much as possible and muscle fibers but almost pain free.
- Active stretch. With it, the effort is achieved due to its own movement. At the same time, the muscles contract more actively, and the tension is at the limit for the athlete.
- Ballistic stretch. Ballistics is aimed at accelerated movements, and therefore requires experience and utmost attention (otherwise, you can tear muscle fibers and damage joints). However, it is also necessary, since the types of loads on the muscles should not only be static.
Technique: what and how to pull?
Neck (head tilt)
- Starting position - standing. The back is straight, look forward. Slowly tilt your head down as far as possible. At the end point, fix the position for 10 seconds. We return to the starting position.
- We repeat the same steps, but with the head tilted back. The mouth is not opened.
- Now we tilt our head to the left - and we help to press it to the shoulder with our left hand (the shoulder itself does not rise). The same fixation - but for 20 seconds. We return to the starting position.
- We repeat the same steps, tilting the head to the right.
- We begin slow rotations of the head clockwise. Then the same thing - counterclockwise (10 turns in each direction).
Arms, shoulders and biceps
The exercise is done at the Swedish wall or other vertical support.

Triceps
How to stretch triceps?

Breast
For this we need bars.
- Starting position - standing, hands resting on the bars from the elbow and above.
- Slowly bend the legs, lowering the body down to the maximum possible (it is easy to determine by the increase in pain).
- We fix the position for 30 seconds, return to the starting position. We repeat 10-15 times.
Press
The easiest way, because it does not require any devices.

Upper back
How do we stretch?
Starting position - standing, chest slightly arched, breathing even.
- We round the back, sticking out the chest, at the same time, for balance, stretching the arms down and forward along with the shoulders (the chin also tilts a little).
- Having reached the limit point - just as slowly, we straighten up.
Fixing the end position is not needed here, and the maximum load should be felt in the area of the shoulder blades. If tension occurs in the wrong place, we try to correct movements until we reach desired result. We repeat 10-15 times.
Loin and back of thighs
The most difficult exercise for beginners (subject to the desire for its correct implementation).
- Starting position - standing.
- As you exhale, WITHOUT BENDING THE KNEES (this is important!) we lean forward and reach for the floor with our fingertips. In the absence of flexibility in the muscles, this will not be possible at first. But you need to repeat the exercise (again and again, day after day) until you can touch the floor with open palms when you bend over.
- On the exhale - take the starting position.
Important! When performing the exercise, the back should remain straight, not arched. Otherwise, the muscles of the back, not the back, will stretch, and the effectiveness of the exercise will greatly decrease.

Legs
How can a man sit on a twine? As a rule, they do not manage to do this as quickly as women. However, it is necessary to strive for this.
The first step in this will be the following exercise:

Legs, in perspective - twine (transverse)
The second step will be an exercise that is performed immediately after the previous one.
- Starting position - standing, hands holding on to a support (for example, Swedish wall or the back of a high and heavy chair), the legs are set as wide as possible (as far as possible).
- Slowly we begin to spread our legs even wider, moving our feet. Each time we will go lower and lower - and even if we do not reach the level of sitting on a full twine, we can be satisfied with the result, at which about 10 cm will remain to the floor.
- We fix in the lower position for 20-30 seconds.
- Just as slowly and carefully return to the starting position.
Legs back and forth, in perspective - twine (longitudinal)

Horizontal bar
It's easy enough to hang on. Often, at any time and without restrictions. Such a vis unloads the spine perfectly, and at the same time trains the strength of the hands.


