Many of you know firsthand: the knee joints are quite fragile. Here are some tips on how to protect your knees from injury in yoga classes, and a set of exercises to strengthen the knee joints.
A more conscious approach to practice will help to avoid knee injuries, which often occur in yoga classes.
For example, you can easily get injured if you try to sit in the lotus position without warming up. To prevent this from happening, it is important to always listen to your body and not strive at all costs to perform the asana in the same way as the instructor does. Each of us has his own anatomical capabilities, and you need to prepare for each difficult asana. For example, if you absolutely want to sit in the lotus, do these knee exercises regularly.
To protect the knee joint from injury, in standing poses watch out
for planting the foot: point the knee in the same direction as the middle toe of the foot.
Performing standing poses, pull your knees with the force of the muscles of the front surface of the thighs. This is not the same movement as pushing the knees back. To understand how to hold the knee with the thigh muscles, sit in dandasana (described below) and remember the sensations that you get when you pull your socks towards you. This is how you should feel when you pull your knees up while standing.
When performing twists from a standing position, twist from the center of the waist, not from the hips. This way you avoid the so-called skier effect - unwanted twisting of the knee joints. The knee should be fixed and tightened, the hips are motionless and pointing forward, as if you are touching them with a wall in front.
If you already have knee problems, do this complex daily and reduce the range of motion a little. As a preventive measure, it is enough to train two to three times a week. Perform almost all exercises in dynamics, in a rhythm of movement that is comfortable for you - both fast and slow. Repeat each movement 6-12 times.
 |
 |
 |
 |
 |
 |
 |
 |
 |
 |
Standing knee bend.
Stand up straight, place your feet hip-width apart. Bend your leg at the knee joint and lift it in front of you to a comfortable height. Make sure that the supporting leg remains straight. Clasp your hands behind your back and pull back. Work dynamically: straighten your leg, pointing it forward and pulling the patella, then bend it back and try to reach the buttocks with your heel. Repeat with the other leg.
Circular movements of the knees
Place your feet together and bend at the knees, lowering yourself to a comfortable height. Place your palms just above your knees. Fulfill circular motions knees, describing circles, first counterclockwise, then in the opposite direction.
Half squat
The starting position is the same. Work in dynamics: bend and straighten your knees without lifting your palms from your legs. Stretch your tailbone down constantly and hold toned muscles belly.
Circular movements of the knees with legs apart
Place your feet 50-70 cm wide and bend at the knees, lowering your pelvis. Put your palms just above your knees, tighten your abdominal muscles. Perform circular motions with your knees, first outward, then the same amount inward. Then, without changing position, bend and straighten your legs without lifting your palms from your knees.
Toe squats
Place your feet together and rise up on your toes. Spread your knees to the sides and stretch your arms forward. Work dynamically: lower your pelvis by squatting at a comfortable height and tightening your abdominal muscles, then rise by bringing your knees together. While doing squats, keep balancing on your toes. Repeat 6-12 times. Then lower yourself down again, spread your knees as wide as possible and hold this position for 30 seconds to three minutes.
Dandasana
Sit down, stretch your legs forward. Put your hands behind your back, push your fingers off the floor, stretch the top of your head up, stretching the entire spine. Pull your toes toward you, tighten your front thighs, and pull your kneecaps up just enough to lift your heels off the floor. Hold the pose for 30 seconds to a minute.
Lying knee bend
Sit on the floor, lean back, lowering your lower back to the floor, and take support on your forearms. Try not to fall on your hands, but push off the floor, stretching your spine. Raise your legs up and bend them at the knees. Work in dynamics: bend and straighten your legs.
Initial position: get up; legs are straightened, both feet are firmly pressed to the floor and do not come off it during the exercise.
Slightly bend the right leg at the knee (while it moves forward) - inhale. Then, without stopping, bend at the knee left leg– and inhale again. Thus, while inhaling, the knee of one leg sharply moves forward, while the other leg straightens sharply at this time. Exhale passively after each breath through the nose or mouth, whichever is comfortable. Remember that exhalation is used, exhausted air, it is forbidden to think about it!

Exercise "Prancing the knees": inhalation phase
The exercise can be done not only standing straight, but also leaning forward, as in the “Pump” exercise from the main complex: the back is round, the head is lowered, the neck and shoulders are relaxed, the hands are above the knees.
You can also put your hands on your knees and perform the exercise, resting your palms on your knees. This position is called the high start position. Many patients find it much easier to do this exercise exactly in this position.
Norm: 96 breaths-movements ("hundred"). Starting to master the exercise, after every 8 breaths-movements, rest for 3-5 seconds. Having trained well, you can do 16 or 32 breath-movements without rest.
The exercise “Pranking the knees” strengthens the knee joint, it is indicated for its arthrosis. It also strengthens the hip and ankle joints. It is used as a prophylactic for fractures and dislocations.
Exercise "Carroting the hips"
Initial position: stand up straight; both feet are firmly pressed to the floor and do not come off it during the exercise.
On the count of “one”, push the right thigh back to failure, while the left leg is bent at the knee - inhale.
On the count of "two" without stopping, push your left hip back to failure, while the left leg straightens and bends back, as if you want to push the person behind you with your hip - inhale.
The body is relaxed, with a push of the hip back, the body moves forward. The arms are relaxed and hang freely along the body. If they interfere with your movement, you can put your hands on your hips.

Exercise "Carroting the hips": initial position

Hip Prancing exercise: inhalation phase
Think of a rag puppet being pulled by strings. This is how your body should be relaxed when doing this exercise. And do not forget to sniff noisily, all over the apartment with every movement.
So, push the hip back, the knee of the other leg moves forward - inhale. Another hip back to failure - inhale. Exhalation is absolutely passive and is performed independently after each inhalation.
Norm: 96 breaths-movements. Rest after every 8 or 16 breaths-movements, and with good fitness - after 32 breaths-movements.
You can perform all three of these exercises in sequence at a time, reducing the rate for each to 32 breaths-movements. In total, the same Strelnikov's "hundred" will turn out in this way.
This exercise strengthens hip joint, causes a sharp rush of blood to the pelvic organs. Especially recommended for teenagers who are lagging behind in physical development, but contraindicated for independent use in S-shaped scoliosis. It is an excellent therapeutic and prophylactic agent for prostatitis, impotence and other disorders of the genitourinary system in men, helps to eliminate a number of gynecological diseases in women.
Three exercises from the group "Carrot" are incredibly useful for the lower extremities!
Firstly, they develop and strengthen the legs well, making them more mobile and strong.
Secondly, along with muscles, ligaments and tendons, the hip, knee, ankle joints and the entire foot are strengthened (talocalcaneal-navicular, calcaneo-cuboid and wedge-navicular joints, transverse tarsal joint, tarsus-metatarsal, metatarsophalangeal and interphalangeal joints of the foot ).
Thirdly, the blood flow in the arteries of the thigh, lower leg and foot improves, the walls of the superficial veins are strengthened, and congestion in the lymph nodes and vessels of the legs.
Exercise "Circular movements of the knees"
Initial position: high start pose. Stand up straight; legs straight, feet and knees together. Bend your back, lower your head, relax your neck and shoulders. Rest your hands on your knees.


Exercise "Circular movements of the knees": inhalation phase
On the count of “one,” sharply bend your knees (knees push forward with a push) and inhale briefly, noisily through your nose. Immediately, without pause, perform a circular motion with two knees bent to the right and at this time exhale absolutely passively. Straighten your knees at the end of the circle. Then, while inhaling, repeat a sharp lunge with your knees forward, that is, sit down slightly on both legs, while passively exhaling, again perform a circular motion with your knees to the right and return to the starting position. The torso is tilted all the time, as in the “Pump” exercise, the hands do not come off the knees.
Please note: after each circular movement, the knees must be straightened, after which they sharply bend while inhaling, as during a half-squat.
After taking 16 breaths-movements, straighten up, lower your arms and rest for 3-5 seconds. Then again take a high start position and perform 16 breaths-movements, rotating your knees already in left side. In total, 32 breaths-movements will turn out.
Norm: 96 breaths-movements (three "thirty").
With good training, you can take 32 breaths-movements without stopping (16 rotations in each direction) and only then rest for 3-5 seconds (if you are tired, increase the pause to 10 seconds).
Do not forget that a short and noisy breath through the nose is taken only while bending the knees forward, and with a circular movement of the knees, the air leaves on its own through the nose or mouth. “Exhalation is the outgoing breath!” - Alexandra Nikolaevna Strelnikova reminded patients.
This exercise strengthens the knee joint, it is indicated for its arthrosis. The hip and ankle joints are also strengthened. It is also used as a prophylactic for fractures and dislocations.
Standing knee hula hoop exercise
Initial position: stand straight; straight legs are spaced slightly narrower than shoulder width (main stance), arms are freely lowered along the body.
On the count of "one", quickly move your legs at the knees, press them against each other - a short noisy breath.

Standing knee hula hoop exercise: starting position
On a passive exhalation with slightly bent knees, perform circular movements (while starting the rotation with the movement of the knees forward), as if describing circles with a compass: with the right knee to the right, and the left knee to the left.
Never lift your feet off the floor. And try to "draw" circles as much as possible bigger size(that is, spread your legs as far as possible to the sides).
The knee is an anatomically complex joint, which bears the entire weight of the body during movement. painful and for a long time incapacitates even experienced athletes. According to the results scientific research 26% of the adult population of the planet suffers from knee pain, the number of complaints has been constantly growing over the past 20 years. Do not wait for alarms, act proactively: regularly perform simple exercises to strengthen the knees to reduce the risk of injury.
The best way to prevent injury is to have strong, flexible muscles and joints that can withstand stress and injury. In some simple cases of knee pain, certain exercises can help relieve the pain. Remember, never do any exercise that causes pain to increase.
Before class, be sure to warm up the muscles in order to prepare for the loads, improve local blood circulation. A good option warm-ups - circular movements of the knees while standing on slightly bent legs.
There are 2 options for the exercise. The leg lift is performed from the starting position lying on the back or the leg is lifted from the position lying on the side. The first option additionally includes the thigh muscles, the second option - the abdominal muscles.
Option 1:
- Lie on your back. The shoulder blades and lower back are firmly pressed to the floor. One leg is bent at the knee, the other is straightened.
- Lift your straight leg off the floor, hold on weight for 15-30 seconds, return to the starting position.
Option 2: 
- Lie on your side. Lean on your forearm. Bend the lower leg at a right angle, straighten the upper leg.
- Raise and lower your straight leg.
All movements should be performed slowly and smoothly.
Lunges
Lunges place stress on the knees, helping to strengthen the calves and thigh muscles, stabilize the knee joint.

- Starting position standing, legs together, hands on the waist, back straight.
- Step forward with one foot and bend both knees at the same time.
- The extended leg, when bent, forms a right angle. The back knee almost touches the floor.
- Return to starting position. If you do everything right, you should get springy movements.
- Repeat the same movements for the second leg.

- Starting position standing, back straight.
- Bend your knee and lunge to the left.
- Without straightening your knees, shift your weight to the other leg in a lunge to the right.
- Make sure that the knee of the supporting leg is exactly above the foot.
Stretching
Stretching exercises are done from different starting positions. The lying position helps to avoid the load of its own weight.
Stretching in the supine position, technique: 
- Lie on your back. Raise one leg, bending at an angle of 90 degrees. Straighten the other leg on the floor.
- Slowly unbend bent leg, point the sock towards you. Then return to original state.
Standing stretching technique: 
- Lean on a firm surface for balance. Pull the left leg bent at a right angle to the back.
- Hold at the top for 3-5 seconds.
- Return to starting position.
- Repeat the movement with your right foot.
Exercises are performed without jerking at a comfortable pace. Stretching improves muscle elasticity, relieves stiffness in the knee joint.
"Martin"
 The Swallow exercise trains the leg muscles while improving balance and coordination.
How is it done:
- Starting position standing, back straight, legs brought together. Spread your arms out to the sides at shoulder level.
- Lean on one leg, tilt your torso forward, take the other leg back, reaching parallel with the floor.
- Hold this position for as long as you can, then return to the starting position.
 Contrary to the popular myth that squats are dangerous for the knee joint, this exercise is performed in correct technique, heals the knees, strengthening the ligaments and muscles of the legs.
Technique:
- Stand straight, feet shoulder width apart. Take your shoulders back. Pull your stomach in.
- Slowly lower yourself, pulling your buttocks and hips back.
- Bend your knees until muscle tension. Then get up.
- Maintain balance and coordination, do not round your back. The knees should not go beyond the line of the socks.
When doing squats, you can’t rush, fall down with a jerk
Options for reducing the axial load:
- wall squats;
- squats, holding hands on a support.
Try to spend 20-25 minutes daily on your knees. Efficiency is guaranteed only by regular physical activity. Keep your health for a long time!
Be sure to read about it

If you have had a knee injury or suffer from arthrosis of the knee joint, you may be afraid to give a painful joint a load. And this is the biggest mistake that a person with joint problems can make.
And after injuries, and with arthrosis, and with arthritis, and with other joint ailments, the knee must be given physical activity. Another thing is that it should be done correctly. Below are 12 safe exercises to strengthen both healthy and diseased knee joint.
This is the simplest exercise that even people with severe joint damage should perform.
- Sit on a chair. Feet are on the floor. Hands rest on the knees or lowered to the sides of the body.
- Slowly raise one leg, straightening it at the knee.
- Hold the pose for 2-3 seconds, then return to the starting position.
- Repeat 10-15 times for each leg.
Hamstring tension
- Stand up straight. You can stick to a wall or a chair. However, it will be better if you do the exercise without support. This will not only give a load on the tendon, but also improve the functioning of the vestibular apparatus.
- Slowly bend one leg at the knee, moving the foot back.
- Repeat 20 times for each leg.

If you don't have any serious problems with your knees, give them additional load. To do this, do not lift your free leg, but pull an elastic band or expander with it. 
Calf stretch
- Stand facing a wall with your palms on it.
- Take your right leg back, and put your left leg forward and bend at the knee, transferring the entire body weight to it. In this case, the knee of the right leg should remain straightened, and the feet of both legs should be pressed to the floor.
- Hold the pose for 30 seconds.
- Repeat for the second leg.

Lateral hip lift
- Lie on the floor on your left side.
- Raise your body by leaning on your left forearm. Lift your left thigh off the floor, accepting.
- It is not necessary to hold the pose for a long time. You can jump right back.
- Do 30 repetitions for each side of the body.

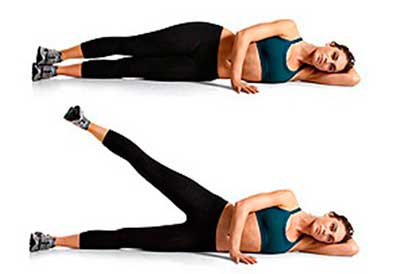
Lateral leg lift
- Lie on the floor on your left side.
- Raise your body by leaning on your left forearm. Raise your right leg up, trying not to bend it at the knee. Raise as high as you can.
- Do 30 repetitions for each leg.
Straight leg lift
- Lie on your back. The arms are parallel to the body and pressed to the floor with the brushes.
- Bend one leg at the knee, and lift the other up. The leg should remain straight and form an angle of 90 degrees with the body. Do not tear your lower back or arms off the floor.
- Repeat 10-12 times for each leg.

Leg raise, prone
- Lie on your stomach.
- Raise one leg up, without bending it at the knee, as high as possible.
- Hold the pose for 3-5 seconds.
- Repeat 10 times for each leg.

- Stand straight with your legs apart 1.2-1.4 meters.
- Place your hands in front of your chest.
- Slowly bend your knees. Ideally, your thighs should be parallel to the floor. But if this is not possible, just bend your legs to the extent that your physical fitness allows.
- Keep your back straight and your knees out to the side (you may want to bring them together, but don't give in to that urge).
- Hold the pose for 15 breaths and then slowly return to the starting position.
- Repeat 3 times.

- Stand up straight.
- Slowly sit down so that a 45-degree angle is formed (knees should not go beyond the toes).
- Fix the pose for a few seconds. In order not to fall, protect yourself from behind with a chair.
- Repeat 10-15 times.

Climbing stairs
- Stand up straight with a small bench in front of you.
- Raise your right leg on it, and then pull your left leg up.
- Return to the starting position and make a rise to the bench, starting with the left foot.
- Repeat for each leg 20 times.

To increase the load, take dumbbells.


