The horse is considered not only a beautiful, but also a noble animal. It's quite difficult to draw. But if you learn to do this, it will be much easier for you to portray other ungulates. To easily complete the task, you need to learn how to draw a horse with a pencil step by step. Let's look at a few simple options.
Types of drawings
First you need to decide on the plot and pose. How to draw a horse? Pencil or paints? Also think about other details of the picture. For example, to draw a jumping horse, you need to know its fulcrum points. It's not that simple. It is often suggested to portray a frightened horse. In this case, pay attention to the nostrils and jaw. They serve to convey the emotional state of the animal. The distinct appearance of the jaw and skull bones makes the drawing more realistic. For this type of picture, a simple image of an animal’s head is suitable. When you draw a horse full height, then do not forget about the proportions of the body.

Proportionality of the drawing
How to draw a horse with a pencil so as not to disturb the proportions? In such situations, they resort to schematic sketches. That is, all parts of the body begin to be depicted in the form of geometric shapes, most often circles or ovals. Then they smoothly connect and turn into a solid pattern. Don't miss the correct transfer of bends, joints and hooves. To do this, it’s a good idea to at least slightly study the anatomy of horses. The animal's head is the most difficult to depict. Therefore, you first need to learn how to draw it separately, and then start drawing the horse in full height.
Don't forget about the nuances. When depicting, for example, a walking horse, pay attention to its mane. She is well-groomed and beautifully styled. Portraying old horse, draw more of her ribs and sad eyes. To correctly convey on paper a horse that has switched from running to walking, you need to depict its fatigue and heavy breathing. The animal looks quite beautiful in a jump. All the lines of his body tense, at such a moment the perfection of the horse clearly appears.
The main thing is to be careful. A stubborn horse looks interesting. Her mane flows, her movements speak of willfulness and refusal to submit. A horse on arable land also looks specific. When drawing her, pay attention to the neck. When an animal bends over, its neck lengthens. In a sad horse, the muscles are more relaxed, the corners of the mouth are lowered. The most difficult thing to draw is a running beauty. It looks relatively unrealistic. This happens because it is difficult to capture high speed.

Step-by-step image
Probably no one can dispute the importance of horses in history. In the Middle Ages, for example, these noble animals were exploited. They were used for both passenger and freight transport. How would wars go in those days? No cavalry could go into battle without horses. Out of respect for these animals, you should know how to draw a horse with a pencil. Follow the advice step by step. In addition, compared to other animals, horses are distinguished by their intelligence and loyalty to their owner. And some of their species, such as mustangs, are considered a symbol of disobedience and free character.
So, let's move on to the immediate answer to the question: “How to draw a horse step by step?” The first step is to draw the centerline of the animal's body. This is done in the form of three circles - head, chest and back. Then we add additional strokes to connect them. This is how the neck, back lines, abdomen contour, tail and limbs appear.
Let's move on to a more accurate drawing of the horse's head, its nostrils and jaw. We depict the mouth, you can convey the rage of a stallion, for example, if he reared up. Then we sketch out the contours of the neck and move on to the muscles on the front legs and shoulders. We clearly draw out all the details of the horse's head. Add ears and draw a mane. Don't forget about the detailed images of the eyes, nostrils and teeth. When drawing an aggressive stallion, we pay special attention to the mane. It has sharp edges. The horse seems to be wound up, tense and ready to attack. If the front part of the horse's body is ready, let's move on to the back pair of legs. They are muscular and strong. The animal seems ready to take off at any second.

The final stage involves finishing the tail, a more accurate depiction of all the muscles of the animal. Then we delete all additional unnecessary lines. So, the sketch is ready. By following all the tips listed above, you will learn how to draw a horse with a pencil step by step.
Considering the magnificence of the animals in question, it is difficult to argue with the complexity of their depiction. Therefore, we will give some tips on how to draw a horse for beginners. This means that you should start by depicting two ovals for the head and torso. Then we connect them using curved lines. Thus, the neck of the animal is obtained. We finish drawing the ears; they have a sharp and neat shape.
Let's move on to the shins. Do not forget that the back tibia is much larger than the front. The next stage is drawing the tail. It is long, curvy and beautiful. On the head we add eyes and a mouth, and shape the nostrils. The shape of the mane is conveyed using zigzags and jagged lines. An important element is the hooves. In place of each knee we draw an oval; it will help to correctly draw the bent limbs of the animal. The hooves themselves have an angular shape. All you have to do is choose: an image of a free horse or with a harness. The second option involves finishing the saddle and bridle. So we found out how to draw a horse with a pencil step by step. It's not all that complicated.
Children's version
In childhood, probably, almost every child wants to have a horse, at least a pony. But not all children have the opportunity to realize their own dreams. Sometimes parents simply cannot afford to buy this beautiful animal. In this case, in order not to disappoint the baby, why not invite him to depict his dream in a picture? How can a child draw a horse?
We start the lesson by drawing a curved line - the upper contour of the animal's neck. We continue this line, outlining the back. All curves are smooth. Then we outline the lower contour of the neck. We sketch the head using geometric shapes. Square - cheek. Draw a rectangle to it. At the end, add a circle in the place where the mouth should be. We make the lines as smooth as possible. We draw out the ears and nose of the horse, his eyes. Let's move on to the body. We try to convey the shape of the animal’s body as believably as possible. We finish drawing the legs and drawing out the hooves. We add details to the drawing and finish the tail. So it turned out to be a cute horse.

Practice
Few people get the perfect drawing the first time. But by devoting the necessary time to work, you will get better at it and learn how to depict not only the horse, but also the background. This could be a field or the edge of a forest. It would be nice to depict a whole herd. This is the only way to learn how to draw beautiful horse.
Mascot
Figurines and drawings of horses are used as protective talismans. If you have a friend who needs help growing their career or achieving a goal, draw and give this animal to them. The picture will be useful in his activities.

Transfer of useful knowledge
Having learned how to draw a horse with a pencil step by step, you can pass on the skill to your younger brothers or sisters. These skills will be useful to you in the future when you have your own children. As they say, you don’t carry knowledge behind your back.
Adults and children strive to develop their creativity and talents. Drawing - great way for self-expression, development of imagination and stress relief. Animals are a favorite theme for the drawings of professional artists and artists. Therefore, you will probably be interested in learning how to draw a horse.
Using the simple technique presented below, you can easily depict
- Horse in motion
- Horse and rider
- The animal is in a calm state.
Useful tips will help you and your child quickly learn how to draw today. Don't delay, take out a sheet of paper and a pencil and get started.
How to draw a horse with a pencil step by step
How to draw a horse with a pencil step by step is the main question for beginning artists, because this is the easiest way to cope with the task.

- Before you begin the process, take a sheet of paper and think about the composition of the future painting. Then, mark the boundaries of the image. It is best to apply light lines in the form of a rectangle. The figure will be a field for work, this greatly simplifies the following steps.
- You need to start from the head. For its basis, a triangle of not too large size is used. Required condition is the rounded shape of the future head. It should be placed in the upper left corner of the outlined rectangle.
- On next stage, two ovals should be marked. They should be located at a slight angle relative to.
- We form the belly by connecting ovals. We draw the lines smoothly, without kinks or sharp transitions.
- Next is the most difficult part - the legs. This stage is quite complex and requires a special approach. You need to start by drawing dots that indicate the bends of the animal’s limbs. Afterwards, they are connected by straight lines. Remember the peculiarities of body proportions so that the picture looks harmonious. Please note that horses have high knees.
- Now you need to draw the legs and finish the hooves. The resulting image needs to be given volume. They should be plump and muscular. In the shape of a trapezoid with a slight lift towards the top back draw hooves. Draw your knees protruding forward.
- Start with the front legs, then move on to the back legs. Don't forget that the back ones above the knee are much thicker than the front ones. Otherwise, the drawing will seem disproportionate and unrealistic.
- Once the limbs are finished, we begin drawing the neck. This stage also has its own characteristics. To depict the neck correctly, stick to the golden mean. A thick or thin neck will spoil the design. It is important to convey the grace and elegance of the animal. But at the same time, the part of the body being drawn must be quite powerful. Lines and transitions should not be sharp. The transition from head to body is depicted very smoothly due to gradual expansion. Achieve a slight curved effect.
- Now you need to draw a clear outline of the animal’s body, head and legs. Mark the main lines of the future drawing.
- Get rid of the auxiliary lines that were marked during the work. To do this, use an eraser. Be careful and careful not to remove the main parts of the image, do not leave streaks. Once you are done with this stage, you will not be distracted by anything.
- It's time to start drawing the head in detail. Try to make the face look realistic. Don't neglect the details. Draw large eyes, highlight the ears and large nostrils. This is an important part of the work, since the overall impression of the picture depends on the quality of its execution.
- The drawing cannot be considered complete without drawing the tail. By at will, the artist can depict a cropped, braided, elasticated or freely developing tail. The last option will give the drawing more dynamics; this option is especially relevant for an animal in motion. Thanks to this detail, the viewer will immediately understand that the animal is not standing still.
- We finally get rid of all unnecessary auxiliary lines.
- Another important detail is the image of the muscles. They are indicated by light strokes in the area of the front and hind legs and on the neck. If you have any doubts about where the muscles are located, look at photos and training videos on the Internet. In this way, it will be possible to give believability and power to the depicted object.
- In the appropriate place, draw a lush mane blowing in the wind. There is no need to carefully draw every hair. Once you have outlined the line of your mane, divide it into individual curls. This step allows you to make your mane voluminous.
- The bends of the joints on the animal’s limbs are indicated by light, neat strokes.
- Let's make the picture three-dimensional. Use pencils or colored pencils. Apply strokes using the shading technique. Mark light transitions on the body, the effect is achieved by darkening individual parts horse
- The horse is ready. Creating a complete picture will require a background image.
Draw the horse's head
For those who want to perfectly master the technique of depicting a horse, you will need to pay sufficient attention to working out the details.
Mainly we are talking about the muzzle, since this part of the body contains large number small and difficult to master parts. At the same time, it is very important that the animal’s head looks organic, fits well into the composition and matches the proportions of the body.
Mastering the technique of depicting a head will allow you to create portrait paintings of horses in any style and technique in the future. Follow the algorithm presented below, and mastering this stage of artistic work will be very simple.
- To start, work on the front of the head. Sketch the nose, paying special attention to the part that protrudes forward. Don't forget to maintain the correct proportions. Before starting work, it will be useful to study additional sources and view paintings by famous painters.
- Start with the eyes. They should be located at the top of the muzzle. Draw them as small ovals.
- Draw lines to indicate the neck, using light strokes to mark the folds on this part of the body.
- Draw a soft semicircle to indicate where the ears will be drawn later. As in the previous case, the lines should be drawn with a light movement without pressure.
- Now we should return to working on the eyes and neck. Draw eyeball. Draw the neck with clearer and more confident lines. To avoid spoiling the picture, check the photographs of the animals. Do a good job, you did it, and if something doesn’t work out, erase it and do it again.
- Draw an eyebrow. It should be made in the form of a fold above the eye.
- It's time to get back to the ears. We depict the ears in a semicircle.
- Don't forget about the nostrils. After that, draw a clear line around the bottom of the head and draw the upper lip.
- It's time to start working on the details of the portrait. First of all, this concerns the drawing of the lower lip. The folds in the neck, nose and eyes will add realism to the picture.
- Now get busy internal part ears.
- No less important is the image of the bangs and mane.
- Get rid of unnecessary construction lines using an eraser. To avoid the effect of a sloppy, dirty design, do not leave streaks. Outline the main lines with a clear outline.
- Using the effect of light and shadow, we add volume to the portrait. Shade the dark areas of the head: nostrils, ears, some areas of the neck, nose.
The bulk of the work is done. If desired, color the picture with pencils, markers or paints. As you can see, drawing a horse's head is very simple.
How to draw a horse with wings
How to draw a horse with wings will be, first of all, interesting to kids or adults with children. Winged Pegasi- the main characters of famous legends, fairy tales and cartoons. This mythological beast amazes with its beauty and looks very impressive. Since ancient times, it has served as a symbol of love of travel, endless flights of fantasy, as well as love and courage.
In this section, we will tell you how to special effort draw a flying horse.

Remember a simple algorithm for working on Pegasus.
- The basis for the future sternum, head and croup of your Pegasus will be three ovals. We suggest mastering the drawing when the horse is facing the viewer. In this case, the back of the body will be on the side, and the head will be located above the chest.
- We connect the oval of the head and body. This way we get a proportional, powerful neck.
- Before you begin the wing drawing step, consult additional resources. Carefully study how artists depict wings. Now, from the upper front part of the horse's body, draw two arched lines. Draw two more shorter arcs a little lower.
- It's time to get back to working on the pegasus body. Connect the back oval with the horse's body. Carefully work the stomach and the curve of the back. These lines can be given a clearer outline.
- Go back to the wings and draw them carefully. Their upper part should have a rounded shape, and the lower part should be slightly wavy. To make the schematic image take on real shape, detail the wings and outline the feathers.
- Return to detailing the horse's muzzle. Mark the lower lip, draw the nostrils and large eyes of the animal. In the corresponding part of the head, draw small ears.
- Now do your legs. Don't forget about proportions. The hind limbs should be more massive than the forelimbs. Even if you want to portray the pegasus as slender, the legs should still be muscular and not too thin. After all, Pegasus is a strong animal. If you want the picture to look dynamic, let one of the front legs be raised.
- The last step is to erase all unnecessary lines on the sheet, clearly marking the contours of the body with clear lines. It would not be superfluous to outline the muscle lines on the body of the winged creature.
Pegasus - ready, you have completely mastered this technique. As in previous cases, your mythical hero can become colored using pencils or felt-tip pens.
How to draw a horse with a rider
In this section you will learn how to draw a horse and rider. This lesson is a little more complicated than the previous ones, because it is necessary to maintain the proportions of the animal and the person on it. However, the end result will not leave anyone indifferent. Don't be discouraged if it doesn't work out the first time. Don't give up trying and hone your technique. But if you work carefully and check with similar samples, there will be no problems.

So, follow the following instructions:
- As in the previous cases, the easiest technique is to start with rectangles and ovals. First, draw a large horizontal rectangle, which in the future will become the body of the horse, the future head is indicated by the same figure of a smaller size. Please note that the animal will have its head bowed, this is a more natural position for a horse. Therefore, the future muzzle should be located at an angle relative to the body.
- Connect both rectangles. This way you will get a neck of the appropriate size and proportions.
- It's time to work on your feet. To make the legs look as realistic as possible, study drawings and photographs of horses. These parts of the body should not be absolutely straight, and remember that their width is different. Above the knee the legs are much wider. It will look good if one of the front legs is slightly raised and the other slightly bent. But the hind limbs are drawn slightly apart.
- Don't forget to draw a tail.
- Now is the time to start depicting a person. To do this, draw a vertical rectangle. It should be located closer to the middle of the horse's body.
- Above the rectangle, draw a small oval, which will serve as the basis for the head in the helmet.
- Get busy with your hands. Start with the right - according to the idea, it should stretch in left side. The opposite arm should be in a half-bent position with the palm clenched into a fist. Try to position your fist between the animal's body and neck.
- It's time to portray lower limbs rider Since, according to our idea, a person sits so that only one leg is visible, the task is significantly easier. But note that it should be slightly bent.
- Work out the details. Start with the person's face. Draw the eyes in an oval shape, border them on top with short but thick eyebrows. The nose is indicated by a wavy line. The mouth does not require special attention; a small, slightly curved arch is sufficient. The rider's mustache and beard will complete the look.
- Don't forget that our rider is a knight. A helmet and chain mail will give him the appropriate surroundings. The basis of the headdress is a triangle, the continuation of which reaches the beard, covering the side of the face.
- Armor must have a clear geometric shape. Draw the chain mail well. The armor covering the legs is drawn in steps. The knight's hands are protected by large gloves.
- One of the final stages is working on the horse's head. Clearly outline the lines of the eyes, lips and nostrils.
- A well-depicted tail, mane and ears will make the picture even better.
- Draw the harness: the saddle, reins and stirrups, as well as the sword in the hands of the rider.
The picture is ready. As you can see, drawing a horse with a man on horseback is quite easy. If you think that a black and white painting looks dull, color it.
Drawing a harnessed carriage
A more complicated option is drawing a horse and carriage. Beginners are not recommended to immediately take on severe cases. Learn the technique of drawing a carriage with one horse. This way you will understand the basic principles of imagery.
Once one harnessed horse is easy to draw, you can complete the desired number of horses. Then only their individual parts will be visible: leg, head, tail. Drawing a new drawing with several horses is also not difficult.

So, let's start by mastering the simplest image technique:
- Draw the base of the carriage as a not too large square. Place a horizontal rectangle nearby, which will later turn into a horse.
- Draw a small horizontal rectangle to the square. This will become the place where the coachman sits.
- Get back to working on the horse. Draw an oval of the appropriate size, located at an angle, since the head will be slightly lowered. Connect it to a rectangle. This way we will teach the neck and head of the animal.
- The legs should correspond to the proportions of the body, not very thin, but not thick, widening towards the top. Length - average.
- The tail and mane are drawn quite symbolically, without drawing individual hairs.
- Take care of the details of the head. Draw the ears, but cover the eyes with overlays for believability. Mark other parts of the harness. The shaft is depicted as one diagonal line running from the body of the horse to the carriage.
- Pay attention to drawing the hooves.
- Start working on the carriage. The front wall should be straight, and the back wall will look more natural if it is slightly rounded. To better understand how a vehicle should be ironed, study the structure of the carriage well from other paintings.
- Try to draw beautiful wheels. Please note that the front and back circles are different sizes. Outline the wheel axles.
- Try to imitate a cab driver. This will make the picture realistic and give it dynamism. The coachman sits in front, his body is drawn in profile. The figure does not require serious drawing; you can get by with a schematic image.
- Draw an oval (torso); above it is a smaller circle, and above it is an even smaller rectangle.
- Using two lines in the oval we outline the driver’s hands. Draw a cylinder from a small rectangle. Now, complete the eye and hair of the person using shading.
- Take a schematic designation of the profile. Draw the nose as a protruding line and a rounded chin.
- Complete the picture with strokes, shadows and lines that will give it realism. Use the eraser to get rid of the guide lines.
- The harnessed carriage does not have to be colored. It looks good in black and white too.
How to draw a horse step by step on its hind legs
When the question arises of how to draw a horse step by step, making the picture dynamic and alive, the first thing that comes to mind is to depict a horse on its hind legs. In this position it will be possible to best convey the power and beauty of the animal.
Let's get started:
- Before you begin the actual work, think about how to arrange the composition of the drawing, mentally mark its boundaries, and determine the horizon line.
- Please note that it is recommended to place the drawing sheet vertically. This is due to the position of the figure in space; it will stand on its hind legs, stretched out in length. Therefore, the recommended arrangement of the sheet will create a more impressive look.
- Outline a large vertical oval. On the side above it, draw a smaller oval. As in previous cases, these geometric shapes will serve as the body and head of the horse.
- The neck is obtained after connecting two ovals. Visually, she should look powerful and muscular.
- In this case, the hips require increased attention. The forelimbs and thighs appear stretched down in the picture. To understand the technique of drawing lines, study similar images and practice.
- The lower parts of the legs will be positioned differently. Since the horse stands on its hind legs, they will be elongated, with an almost straight shape. From knee joints limbs are depicted vertically. The hooves are slightly lowered.
- Get to work on transitions. Let them be smooth, slightly rounded. Outline the main lines of the torso, head and legs. Mark the joints in appropriate places.
- Clearly outline the details of the muzzle: eye, nostril, ear. The horse's head is in profile.
- The carefully drawn mane and tail make the picture lively and realistic.
- Using shading we outline the muscles and light transitions of the animal. In the same way, folds are outlined on the back and stomach.
- Erase the reference lines. Using paints we add volume to the picture.

Horse in a jump
Following the advice of experienced masters, you can easily master the technique of depicting a horse performing a jump. Let's look at the technique step by step.

- First, carefully study images that are similar to what you want to draw.
- You already know that the process begins with two figures that schematically represent the torso and head.
- The head is tilted down and positioned vertically. Using slightly curved lines, we connect the head and torso. This will be the horse's neck. Draw an ear on the head. In this case, there is only one, because the animal is depicted in profile.
- The work on the muzzle does not end there. Draw the animal's nose and nostril, as well as the upper and lower lip, jaw, eyebrow and prominent lines of the eye.
- Let's move on to the main stage - working with the torso. The main condition is the smooth transition of lines. The front legs are drawn first. When jumping, they are in a bent position; in addition, the forelimbs are much thinner than the hind limbs. The part below the knee and the hoof are pressed tightly against the body. It is very important to convey the grouped position of the animal during the image process.
- The hind limbs, on the contrary, are extended. Maintain the correct proportions when the thighs are much thicker than the shins.

- As you already know, detail is very important. Therefore, now is the time to outline the hooves and outline the muscles with light lines.
- You cannot consider a drawing ready if the horse does not have a mane and tail. The effect of movement should be conveyed by depicting them as if developing in the wind.
- Getting rid of unnecessary lines.
- You can decorate the horse.
running horse
Drawing a running horse is much easier than it seems. Please read the instructions below carefully.

Arm yourself with a pencil and get to work:
- We start, as usual, with two horizontal ovals. One, which will later become the body, is drawn in the center. The smaller oval is located a little higher, closer to the left edge of the sheet.
- Connect both ovals with smooth lines. This will become the horse's neck. Don't forget about proportions. The neck is depicted as quite powerful, not too thin, so as not to disturb the natural proportions.
- If you want to make things easier, limit drawing the legs to just two: front and back. This allows for the angle in which the horse is depicted. The front leg should be quite slender. It should be extended forward, the hind limb should be extended back. At the same time, she is much more powerful and muscular above the knee joint.

- Now let's turn a small oval into a head. The muzzle needs to be narrowed towards the bottom. Draw the ear, and outline the line of the cheeks.
- Don't forget about the tail and mane. Make them lush, give them life with shading.
- Make smooth transitions. Then get rid of the extra lines using an eraser.
- The painting is finished, it's time to paint the galloping horse.
horse eye
When it comes to a large image of a horse's head, drawing the eyes requires special attention. After all, this is the most important part of the muzzle, conveying the mood of the whole picture. Therefore, achieve maximum realism of the eyes.

Here is the drawing algorithm:
- Start by outlining the eye first. Follow the lines exactly.
- The eyeball is shaded with dark strokes. Don't forget, it will leave a small light spot representing a highlight.
- To define the pupil, select the center of the eye. There is no need to outline the pupil with a clear line. It is enough just to highlight it with a darker color.
- The skin around the eye should also be darkened, but it should still be lighter than the pupil. To do this, apply light strokes. The folds will be darker in color.
- Look at what happened. Use a shading technique to make the eye look voluminous. You can darken the eyeball even more, however, make sure that a light highlight remains.
Mane
An equally important part of the horse’s image is its mane. To make a horse look like a real one, you need to know some features and rules of the image. A well-drawn “hairstyle” makes the picture realistic and dynamic. They emphasize the beauty and power of the animal.
- It is not recommended to outline the outline of the mane with a clear, thick line. This makes her unnatural. Strands, curls and individual hairs are depicted as light lines.

- The already familiar shading technique will add naturalness to your work. Apply it to the marked lines. Then, with more confident strokes, outline the location of the curls and the direction of hair growth.
- Consider the horse's posture. If the horse is at rest, the mane hangs calmly. When the animal is in motion, for example, rearing, jumping or running, the mane should look thicker. The difficulty of the task is the need to convey how it develops in the wind and rises upward.
- Drawing a book well requires skill and experience.

Use our tips, and drawing a horse will become a simple and enjoyable experience. Practice, hone your technique, and the result will not take long to arrive.
Just recently my son and I were at the petting zoo. The place is interesting, and the most interesting thing is that for children and adults there is an opportunity not only to look at the animals, but also to stroke some of them, and even feed them. We took a lot of photographs, and based on them we prepared a high-quality presentation for the school. And we even mastered an excellent technique on how to draw a horse in a quick and simple way.
First there was a “lesson”. Everyone really liked that they were able to quickly and easily draw a beautiful horse. They showed each other their pictures and told each other why they decided to make their horse white or black, or with “apples.” And then we all had a fun tea party together. The children really liked everything and went home happy, taking away each of their pencil drawings and the acquired skill of drawing horses that they had just mastered.
Everyone left, and my child and I thought, because children from other classes and schools would also probably like to learn how to draw a horse step by step. So much so that even for beginners it is not difficult. And so we decided to show everyone how to draw a horse step by step.
Let's divide all the work into 3 stages:
- Preparation;
- Drawing with a simple pencil;
- Image design.
Stage 1 Preparation
Despite the fact that here we will not start the work itself, and will not draw anything, this is one of the most important stages that will help you learn how to draw a horse. What do we do at this stage?- Let's learn more about the animal, what breeds and types of horses there are.
- We find a suitable photograph or use the picture that we have in the article in order to copy it.
- We prepare everything necessary tools for working on a drawing of a horse: simple and colored pencils, an eraser and paper.

So, it turns out that there are wild and domestic horses. This huge family includes ponies, donkeys and zebras. There are among them wild mustangs and fast trotters, and there are heavy drafts, sporting and walking breeds. And, first of all, it is worth considering photographs in order to choose a suitable object for sketching.

Stage 2. Working on the image
The second stage is learning to draw a horse. Of course, we want it to turn out not only beautiful, but also as close to the real thing as possible. And that is why it is very important that the proportions are respected.Draw three egg-shaped ovals. Two are small, at the edges. In the middle is a larger oval. The distance between them is approximately the same. The first oval is the head, and it is located at an angle of 45 degrees to the middle figure.

Between the two egg-shaped ovals we draw a third one; it “goes” onto both one and the other figure. This is the future body of the animal.
We mark the place where the horse’s legs will be located and draw them with broken lines, as if projecting where their folds will be.

Now it’s easy to make the legs voluminous, and at the same time draw the bottom of the animal’s body.

Now we will learn how to draw a horse's head. We use the shape of our egg-shaped oval, taking into account the large cheekbones of the animal and its nostrils. On top of the muzzle we make 2 small ears on the top of the head.
We connect the first and second oval with two curved lines, this is a powerful and long neck horse Also, draw a curved line from above, between the second and third ovals. This is the body of our trotter.

Erase all auxiliary lines. And we make the horse’s tail and mane, show the muscle lines on his body and depict the nostrils and eyes on his face. The pencil drawing of the horse is ready.

Stage 3. Registration
Our painted horse turned out to be strong and beautiful. It seems that if you decorate it, it will come to life. Well, let's try to do this. But first we outline it with a colored pencil.
All that remains is to completely decorate the picture and make the background, because we really want our mustang, feeling a gust of wind, to be able to rush off into the distance.

Having learned to depict a horse, we tried to add character to its image, love
Today we will continue the series of lessons on drawing animals. We already know how to draw a wolf, a dog and a cow. Now we will teach you how to draw a horse with a pencil step by step. After all, if you think about it, in the Middle Ages it was impossible to do without these living taxis. They served as both passenger and cargo transport. What can we say about the cavalry, without which not a single army in Europe could do in those days. In addition, horses are amazingly intelligent creatures in their working lives. They understand their owner very sensitively and listen to him. Well, mustangs have become one of the symbols of disobedience and free character.
And so let's start drawing our horse friends!
STEP 1. The first thing you need to do to learn is to draw the basic line of the horse's body. You can achieve this by making three circles, one each for the head, chest and rear end. Then add auxiliary lines that will connect them all, starting from the neck, back, belly, tail and legs. 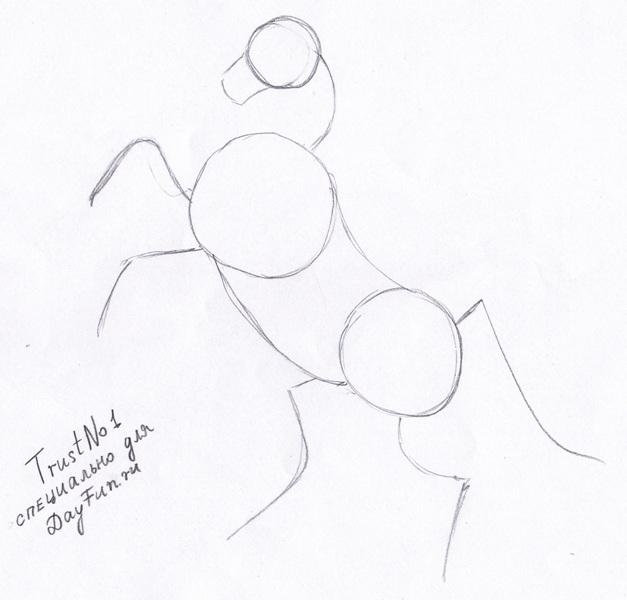 STEP 2. Now you can start sketching out the shape of the horse's head and nose as you see here. Also draw the mouth opening exactly as in the drawing, so that your stallion has a look of rage on his face. Start sketching out the neck, and muscles on the front leg or shoulder.
  STEP 3. We continue our lesson, how to draw a horse with a pencil. Let's start drawing the horse's head, adding ears and the beginning of the mane. Once this is done, you can do the back of the neck and then the curve of the back. Next we draw in more detail the eyes, nostrils and teeth. Perhaps our lesson on how to draw a mouth will help you.
  STEP 4. It's time for the real fun to begin. It's time to draw the horse's mane. Since this stallion is in an aggressive position, you will need to make his mane to make him look wild. A few sharp edges will give this effect. Next you should finish sketching out the front legs, and then the hooves. You should also draw the belly, and the beginning of the hind legs.
  STEP 5. You're almost there guys, just a few more steps to work. Start sketching out the back legs in full shape, and then add one more thing that makes him look like a stallion (gee-gee).
  STEP 6. Lastly, draw the tail of the stallion and then add some minor muscle features like in the picture. Erase the auxiliary lines and shapes you added in the first step to clean up this drawing.
  When you're done, you should have a sketch that looks just like the one you see here. All you need to do now is add color. I hope you enjoyed this tutorial that taught you, . Follow our website, here you can find interesting drawing lessons every day. Leave comments and show off your work. You can copy from the picture that I gave, or look on the Internet pencil drawings of horses and try to draw a horse yourself.
There are even entire books devoted to how to draw a horse. After all, drawing these magnificent and noble animals is really quite difficult. But, of course, if you practice a little, you can still learn to draw horses.
So, before you draw a horse step by step, you should prepare:
1). An eraser;
2). A pen with gel and black ink;
3). Pencil – both ordinary and mechanical pencils work well;
4). A piece of paper;
5). Pencils of various colors.
Now you can move on to learning how to draw a horse:
1. Using light strokes, outline the horse’s head and neck;

2. Draw the horse’s body, which is shaped like a bean;

3. Use simple lines to indicate the front and back leg;

4. Draw the horse’s muzzle, marking its eyes and nostrils. And then draw the horse’s ears;

5. Draw a long, developing mane for the horse;

6. Draw the front part of the horse’s body and its front legs;

7. Also draw in more detail the horse’s hind leg;

8. Draw another one next to the back leg;

9. Draw a voluminous tail;

10. Draw a sketch with a pen, because it is not enough to understand how to draw a horse with a pencil, you also need to learn how to paint it;

11. Erase the pencil drawing of the horse with an eraser;

12. Use brown shades of pencils to color the hooves;

13. Use a flesh tone pencil to shade inner part ears. Color the eye with purple and black. And with a black pencil, shade in places the head, neck, body and legs of the horse;

14. Use a gray pencil to additionally color the horse in places;

15. Lightly paint the tail and mane with dark yellow;

16. Use a yellow tint to completely tint both the horse’s tail and mane;

17. Using a red-brown pencil, lightly darken some areas of the tail and mane;

18. Use green pencils to draw grass.

Now you know how to draw a horse. Horses quite often became the heroes of all kinds of stories and fairy tales, for example, one can recall the magical Sivka-burka. Therefore, before drawing a horse, it is recommended to familiarize yourself with the works of famous artists on this topic. In addition, looking at photographs of these magnificent creatures can help.