Those. multi-joint (the hip, knee and ankle joints are involved) exercise for the leg muscles in the simulator at an angle of 45 degrees, which consists in bending and then extending the legs.
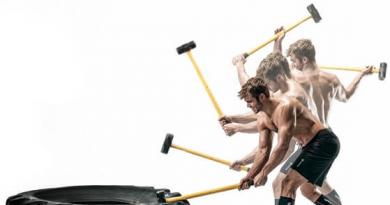
Barbell Squats or Leg Press?
There is an opinion that squats can be replaced with leg presses. Many modern trainers give this advice to people with various spinal problems as an alternative to squats. Allegedly, the load on the lumbar spine is reduced.
Let's start with what it is two completely different exercises. If a person really has some problems with the spine, but he still wants to pump his legs, then yes, for a while we can replace the platform squat. But first of all, it is necessary to understand what exactly the problems are.
Attention: our article is not a reason for action or inaction. First of all, your doctor should explain to you what kind of loads are contraindicated for you.
With leg presses, the load is more purposefully placed on the hip joint, on the region of the sacrum, pelvic bones, and knee joints. We are not standing while doing this exercise, and stabilizing muscles are not involved in maintaining tone A. Therefore, sometimes the situation can worsen from the leg press, on the contrary. the inclusion of the muscles of the body helps to strengthen the tone of the lower extremities, thereby minimizing injuries.
Any sane coach should understand that the minimum load on the spine is in the prone position. In a standing position - the usual load, natural. AND the greatest load on the spine occurs in a sitting position.

When standing, many muscles are included in the work, including the iliopsoas, square muscles of the lower back, gluteal muscles, etc. All these muscles help keep the spine in good shape.. Sitting in the simulator, we practically turn off these muscles, which means we increase pressure on the lumbar region. So all these “let's pump up the ass in the leg press” do not work - the load on them goes in so far as it will have to be perverted in order to transfer it there.
Very often in people, when performing this exercise, tired neck. Everyone knows that the cervical region is directly related to the lumbar. In this case, do not forget about the neck-tonic reflex: tilting the head back, we automatically increase the deflection in the lower back. Thus, the standard recommendation for leg presses is to keep your head pressed against the bench. But in this way there will be increased hyperlordosis in the cervical region, the deflection in the lower back will automatically increase, which means an increase in pressure on the intervertebral discs. Thus, this exercise can lead to injury.
If put a small pillow under the neck, the spine will take a more natural position, the lordosis will decrease, the load from the lumbar will go away.

Anyway: with problems, it is better to consult a doctor, and not to perform exercises by reading an article on the Internet.
The squat is one of the most natural and daily movements in our lives.. So imagine: how many times a day you perform a movement like a squat and how many times you do a movement like a leg press.
The next factor that just screams at the top of its voice that we should make friends with squats is the so-called body for this exercise. The squat, like no other exercise, causes a surge in growth hormone and testosterone, and therefore muscle growth.
Leg press technique:
- “Throw” on the simulator on both sides the required weight from pancakes.
Advice: ALWAYS use the SAME pancakes in ALL simulators so that the load is the same. Those. no need to hang on the leg press on one side 10 kg with one pancake, and on the other 2 to 5 kg.
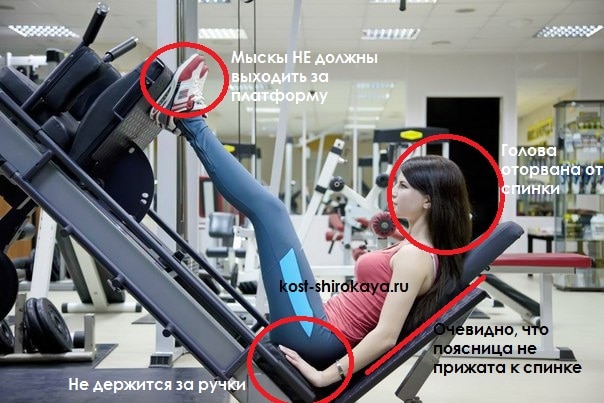
- Take a starting position and place your feet shoulder-width apart in the middle of the platform. Tighten your belly. Breathe from your chest. The center of pressure is transferred to the HEEL.
- Leaning against the platform, slightly feed it with your feet forward, relieving the load from the stoppers. Hold the platform up. The feet should always be firmly on the platform, and the heels should not come off it throughout the entire set. Keep your hands firmly on the handrails - it is easier to maintain a stable body position.
- Slowly lower the cart down to a 90 degree angle at the knee joint.
Perform lowering while inhaling. This is the negative phase. At the same time, at the lower point, the angle of flexion in the knee joint should not be less than 90 °. Your knees should not rest on your chest.
Do not lower the platform below- this will force the lower back to break away from the back and take the load, risking injury. Make sure that the lower back is always firmly pressed against the bench.
Advice: spend on the negative phase about 3 seconds.Count to yourself or out loud 1-2-3, lowering the weight. The bottom line is slow negative movement and powerful positive. You will spend 3 seconds on lowering, and your hips will be bloodshot and groan from satiety with work, but believe me - this is a good stress for further adaptation of the body.
- Extend your knees, pushing the weight with your heels, then return the platform to the starting position.
We do it on the exhale. This is a positive phase. It should be powerful, fast and confident, but very smooth. When moving from a low point, exclude jerks of the body or head.
Advice: Make sure that the knees do not diverge to the sides and do not press against each other during the rise. Press the platform with your heels (press them with force into the platform), but in no case with your socks.
- At the top do not straighten your legs completely keep your knees slightly bent. By doing this, we save our joints and keep the load on the legs throughout the set, which is much more effective.
- DO NOT tear off the pelvis from the seat, DO NOT bring your knees together DO NOT straighten them to the end, DO NOT tear off your heels!
- HANDS HELD THE HANDRAILS FOR ALL REPEATS
- Repeat the movement as many times as required.
It seems to be an easy exercise, but in fact there are many subtleties in its implementation.
Setting the legs in the leg press:
As mentioned above, this exercise is very variable and leaves room for those interested. By changing the position of the legs on the platform, we emphasize the load on different muscle groups.
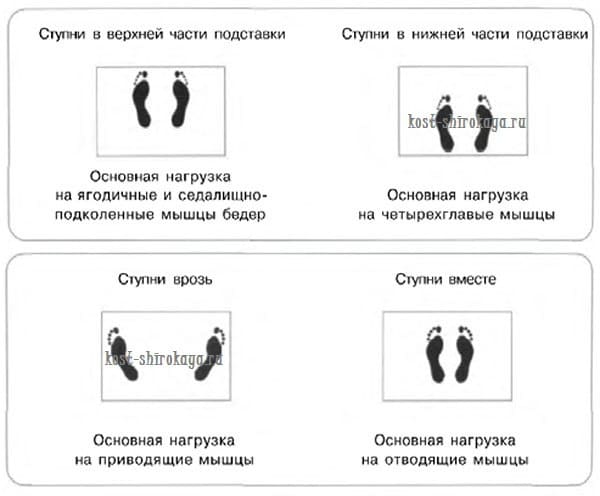
- feet shoulder width apart- load on the quadriceps and hips; the safest option
- feet wider than shoulder width, toes out- the load is shifted to the adductors, the inner thickness of the thigh is being worked out;
- the legs are narrower than the shoulders and are located at the bottom of the platform– study of the outer part of the quadriceps; traumatic option;
- feet at the top of the platform, slightly turning the socks to the sides- the gluteal and ischio-popliteal muscles of the thigh are loaded; traumatic option;
- one leg press- it all depends on setting it around the perimeter, in the classic version, the entire muscle layer of the leg is worked out.
The option is great for girls to create dream priests. BUT THIS OPTION IS FOR ADVANCED. If you are a beginner, please pass by.It may seem that there is no difference - to press with two legs or one. Try it and find out, but believe me, it's much harder than the classic version! The single leg press is a great way to finish each leg individually and by the way, are you sure your legs are equally strong? The single leg press is a great way to even out your legs, but there is also a high chance of injury!
- Try drop sets.
The bottom line is that you perform your working weight for a given number of repetitions. Then reduce the working weight and work another approach without a break. Then again reduce the weight and another approach. Your body will languish in pain, and lactic acid will fill the entire muscle volume until you calm down.
- Don't press with toes!
Although this option is offered as an option for pumping calves, it is very dangerous and harmful to the knees! You never know, do not pull the weight and the platform will jump off - brrr, even thinking is scary.
- Take a chance and try the Full Stop Leg Press
If you are already an experienced visitor to the hall, then this is probably the most brutal training option for you.
To use this method, you'll need a machine that has range-of-motion restraints to keep the weight from pushing down on you. IN NORMAL WE DO NOT. Also suitable is a machine in which it is not the weight that moves, but the bench on which you sit.
The main point is to stop with complete relaxation of the legs.
Step 1. So, first, we select the average weight for 20 warm-up repetitions. Complete them.
Step 2 Increase the weight. Now you need to do 15 regular reps, then immediately do another 5 reps, but use the full stop technique. Lower the weight to the end, relax your legs for a split second, and then squeeze out with explosive force.
Step 3 Increase the weight slightly again. Now do 10 regular reps and 10 full stops.
Step 4 This set, after which most people fall from the simulator in a practically unconscious state. Add weight again, and do 5 regular reps and 15 full stops.
What is the difference with the classic version: usually you do NOT lower the weight until it touches the limiters.
Mistakes
- Bench Press(i.e. you lower the platform down FAST and randomly in the style of "just to lower it, otherwise I'll die").
- Detachment of the pelvis from the back
The platform must be lowered to such a level (according to well-being, a reference point of 90 degrees) that the lower back is glued to the back of the simulator, otherwise the pipe is injured. Therefore, you need to lower the platform until you feel that you are doing a “safe” bench depth.
Safe depth is when your lower back is firmly pressed against the back of the seat. With excessive heroism, the depth becomes unsafe, i.e. you lower the platform with your legs to such a depth that the lower back is already torn off.
- Bringing the knees inward.
Classic. When you take too much weight and your legs are unable to cope with it, the knee dance begins.
It's very, very dangerous, so no records until you're sure!
- Separation of heels from the platform during lowering or during squeezing.
LOWER and SQUEEZE IT IS NECESSARY TIGHTLY WITH THE WHOLE FOOT (emphasis on the heels so that in which case they do not come off).
Some "experts" at the top specifically tear off their heels, like, they also want to shake their lower legs. Do not do this!
Caution: knees
1. As in squats, in bench presses you need to watch your knees - so that they do not “stop” over the line of socks.
Advice: Place your feet close to the top edge of the platform. If you put them lower, the “care” of your knees is guaranteed to you.
2. Place your feet so that your heels are pressing on the platform, not your toes. Otherwise, the knee joints will experience a traumatic load.
3. Do not try to lower the platform as low as possible. At the lowest point, you will inevitably have to tear your pelvis off the support, and this is a direct threat of injury and subsequent lower back pain.
⛔IMPORTANT: your lower back must be firmly "glued" to the support!
Advice: First, ask someone to look after you. Let him follow the correct technique from the side and indicate to you the safe boundaries of the press.
4. Never bend your knees to an angle equal to or greater than 90 degrees. When the legs are bent at an angle of less than 90 degrees, the load presses on the knee joint, and if the angle is more than 90 degrees, it can “break”. Bringing your knees to your chest is not something that is not necessary, but impossible! If this exercise is performed incorrectly, the knees are injured with relatively small weights.. So watch your technique carefully.
2016-09-27